• Welcome, Guest! We hope you enjoy the excellent technical knowledge, event information and discussions that the BMW MOA forum provides. Some forum content will be hidden from you if you remain logged out. If you want to view all content, please click the 'Log in' button above and enter your BMW MOA username and password.

    If you are not an MOA member, why not take the time to join the club, so you can enjoy posting on the forum, the BMW Owners News magazine, and all of the discounts and benefits the BMW MOA offers?

  • Beginning April 1st, and running through April 30th, there is a new 2024 BMW MOA Election discussion area within The Club section of the forum. Within this forum area is also a sticky post that provides the ground rules for participating in the Election forum area. Also, the candidates statements are provided. Please read before joining the conversation, because the rules are very specific to maintain civility.

    The Election forum is here: Election Forum

1971 R75/5 drive shaft boot

chefnation

New member
this forum is awesome. looks like I'm going to have to change the boot on my drive shaft sooner rather than later. dry rot in the crease and looks like a bad rubber repair at some point on upper bellows. cant really pinpoint leak. clamps are as tight as I dare.the aft clamp and boot is positioned uneven. maybe that's it. I hate to mess with it and make it worse. I have maybe 30 days on the road if I'm lucky so I'm just going to drain gear oil (warm) and put 100CC`s back in of 80W-90 to make sure I don't want to run it low for the next month. Not a heavy leak but cant risk.Could someone give me a run down on how I swap out new boot? Want to see if its something I'm even going to attempt. thanks in advance. Jim
 
Would be helpful to find the leak location. Clean up and blow on some baby powder then see where the oil streaks show up.

To replace the boot, you must remove the four bolts that hold the shaft onto the output flange of the transmission. You'll peel the boot back, hold the rear brake with your foot, and loosen the bolts. You should replace the bolts as they can stretch with use. Make sure your replacements are short bolts with no lock washer...BMW went away from the lock washer as they could break and let the fasteners back out.

I don't think there's enough room with the bolts out to wriggle the old boot out and new boot in...you could check and see when you get there. If not, you will need to remove the swing arm pins and pull the back end of the back to the rear...probably more steps are needed then that. There's a specific procedure to reinstall the swing arm pins along with a specially prepared socket to get at the nuts for the pins. This process has quite a few steps in it.
 
Pain

Kurt lays out the basics of boot replacement. I will add the new boot will be marked for front and up, Sorry, I don't remember the exact German words used if any, lol. It is easiest to attache the boot to the swing arm first, this is the biggest pain in the butt you will have, one of the greatest sources of blue language in my garage when I have to do this. Good luck, I feel for you. St.
 
Kurt lays out the basics of boot replacement. I will add the new boot will be marked for front and up, Sorry, I don't remember the exact German words used if any, lol. It is easiest to attache the boot to the swing arm first, this is the biggest pain in the butt you will have, one of the greatest sources of blue language in my garage when I have to do this. Good luck, I feel for you. St.

Sometimes when fitting something like a “boot”, I will take a slice of something like a plastic milk jug and wrap it around the “landing” area. This gives a bit of a “shoehorn” effect for it to slide into place.
Warm temperature helps as well as a bit of soap/lube.
OM
 
Slide

I have never really has a problem with sliding the boot on rather at least on my two bikes, the problem is getting the boot under the clip on the swing arm tube end then getting it all clamped together. I would love to see a video of how the heck they did this at the factory during assembly because I KNOW it didn't take as long to do then as it does now. As I have said before, it is so nice to have proper tools, jigs and an extra pair of hands/robot, to work on things. Stuff I don't always have in my garage. St.
 
Question: How much does the shaft move forward/aft? I believe that the aft end of the shaft is splined, so it moves a bit as the rear suspension travels up and down. So, once the bolts are off at the front, how much could the drive shaft be pushed back? Could it open up enough room to get the boot worked through the gap? :dunno
 
The last time

Kurt good question, I have to say the last time I did one, I took the swing arm pivots out. I don't recall there being enough room to wiggle the new boot in with just the four bolts out. Also, it seems to give a bit more room to work with when fiddling with the rear boot and swing arm. LOL, sorry, teflon memory, it has been almost a year so it is not fresh in my memory. St.
 
Kurt lays out the basics of boot replacement. I will add the new boot will be marked for front and up, Sorry, I don't remember the exact German words used if any, lol. It is easiest to attache the boot to the swing arm first, this is the biggest pain in the butt you will have, one of the greatest sources of blue language in my garage when I have to do this. Good luck, I feel for you. St.

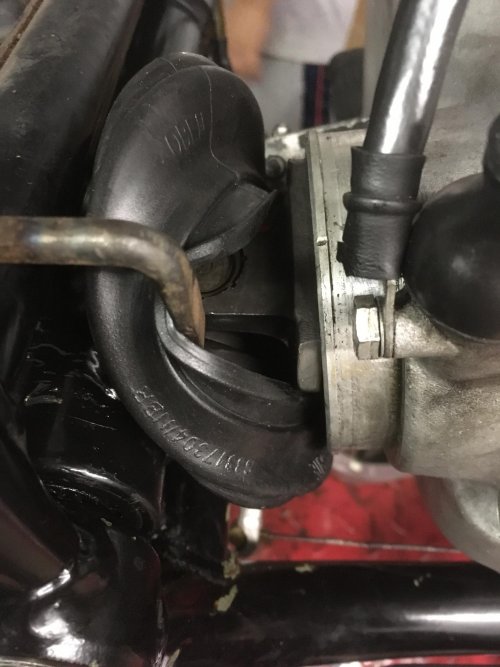
The boots are marked with 'OBEN' for the top and 'GETRIEBESEITE' for 'transmission side.' But the new boots may have incomplete markings. Guess which one is from 1979 and which one is brand new:

Elsa47-L.jpg


Looks like we lost 'OB' over the years.

Here's the bottom:

Elsa48-L.jpg


Vintage part on the left this time.

Yes, you'll need to pull the swingarm pins and pull the thing back to get enough room to get the boot on. You'll also need to disconnect the rear brake rod to move the arm back.
 
r100s RR clutch.jpg You'll need to remove what the others said. This image is on my '77 r100s but this is what you'll see inside, sorry it's dark, notice the labeling on the boot.
 
Jusr completed replacing the clutch friction disk ona 78 R80/7 so this is fresh on my mind. Yes, remove the swingarm pins <sing a 27mm thin wall socket, Disconnect the rear brake actuating rod. Pull the old rubber boot back or better yet just cut it off since you will replace it with a nee one. Now you have good access to the four 10mm twelve point bolts. The original tool kit came with a 10mm twelve point box wrench, and this is the best tool to use to remove the four bolts.

Now you can pull the swing arm back and out of the way to fit the new boot. Tie the wheel back and out of the way. Slip the new boot over the swing arm side and clamp it in place. Pay attention to the markings. Abendis German for UP. The other word, looks like Gezundheidt, is the tranny side. Take a break and get a cup of coffee because youre about to enter the Twilight Zone. This is the hard part. Start by threading one new bolt but dont fully tighten. DO NOT REUSE THE OLD BOLTS! New ones are cheap enough. Thread the second bolt on the diagonal bolt hole and snug it up. Rotate the drive shaft by turning the wheel and install the other two bolts and snug up all four. There is a torque spec for these bolts and in order to reach proper torque you will need a small tool designed for this job. It can be found from the Airhead suppliers like Boxer2valve or Euro Motoelectric just to name two. Replace the brake rod and snug it up. Hold the brake down while torquing the bolts to spec.

To finish up the most difficult part slip the lip of the boot over the bell of the output flange. I usually use one of the clip from the top of the airbox and a hook nose needle nose pliers to get a fit. Install the front clamp. Reinstall the swingarm pins and pay attention to the equal side spacing on each side. Its an art more than a skill. I hope this goes well for you.
 
Back
Top