• Welcome, Guest! We hope you enjoy the excellent technical knowledge, event information and discussions that the BMW MOA forum provides. Some forum content will be hidden from you if you remain logged out. If you want to view all content, please click the 'Log in' button above and enter your BMW MOA username and password.

    If you are not an MOA member, why not take the time to join the club, so you can enjoy posting on the forum, the BMW Owners News magazine, and all of the discounts and benefits the BMW MOA offers?

  • Beginning April 1st, and running through April 30th, there is a new 2024 BMW MOA Election discussion area within The Club section of the forum. Within this forum area is also a sticky post that provides the ground rules for participating in the Election forum area. Also, the candidates statements are provided. Please read before joining the conversation, because the rules are very specific to maintain civility.

    The Election forum is here: Election Forum

"cartridge emulator" front suspension damper notes

gtgt_bangbang

New member
Read enough good to great things about Race Tech's Cartridge Emulators to add to Must-Have list.

Emulator is a spring-controlled check valve / flow controller which is inserted between the original (modified) damper rod and (stiffer, shorter) main suspension spring.

A cartridge kit "specific" for 36mm BMW tubes is ~ $220 from racetech direct , which seems a heck of a lot for what it is but I didn't spot any cheaper sources.

The PN is basically an indicator of diameter , the "33xx" being correct series for 36mm OD tubes,
and there is a less-specific kit that can be had for ~ $140 (genuine. ) which still seems a hecka lot , but enough less to take the leap.

I talked to MFG's tech rep who said the less-specific kit will work fine in the beemer (oi, have to make your own 1" spacer / bushing; easy do)

Will know more today but the "BMW" kit I think just added some short tube spacers to the box.

note - the RT springs came with a short length of stout plastic pipe, a little more sturdy than the usual hack of sched 40 3/4" PVC,
which should be long enough for the required distance pieces plus pre-loaders

Seems to be sufficient info on the MFG's site, and tuning/adjusting the cartridge is a very normal thing to do, (valve spring rate & settings, check valve port size/count),
to make the cheaper kit work jess fine
 
Last edited:
Hope this helps.

https://forums.bmwmoa.org/showthread.php?42105-Gold-Valve-Emulator&highlight=gold+valve+emulator

It made a huge difference on my bike. Well worth the cost in money and time.

yeah & thanks again for the reminder on these emulators, really looking forward to trying , nice keystone for this build.
Hopefully erases the only real issue I had with this bike, sometimes felt like riding a magic carpet made from a worn out trampoline !
( the goose neck on these frames reminds me of a slingshot)

I opted for 0.95 rate springs (0.6 was stock rate , afaik) to cover the spectrum of a 17 stone driver ( plus a couple rocks / minus a few marbles),
the occasional homemaid backrest (ooh hi honey! :love WHAT?!?! no, thats just a typo ! ) and some other baggage
but down the line, it may be a matter of dollars & sense to get another pair of lighter springs to swap in for smoother daily /solo use on real roads.
 
Last edited:
Read enough good to great things about Race Tech's Cartridge Emulators to add to Must-Have list.

Emulator is a spring-controlled check valve / flow controller which is inserted between the original (modified) damper rod and (stiffer, shorter) main suspension spring.

A cartridge kit "specific" for 36mm BMW tubes is ~ $220 from racetech direct , which seems a heck of a lot for what it is but I didn't spot any cheaper sources.

The PN is basically an indicator of diameter , the "33xx" being correct series for 36mm OD tubes,
and there is a less-specific kit that can be had for ~ $140 (genuine. ) which still seems a hecka lot , but enough less to take the leap.

I talked to MFG's tech rep who said the less-specific kit will work fine in the beemer (oi, have to make your own 1" spacer / bushing; easy do)

Will know more today but the "BMW" kit I think just added some short tube spacers to the box.

note - the RT springs came with a short length of stout plastic pipe, a little more sturdy than the usual hack of sched 40 3/4" PVC,
which should be long enough for the required distance pieces plus pre-loaders

Seems to be sufficient info on the MFG's site, and tuning/adjusting the cartridge is a very normal thing to do, (valve spring rate & settings, check valve port size/count),
to make the cheaper kit work jess fine

I made this upgrade to my G/SPD+ about 25 years ago, well worth the investment... the best I could find for the stock forks. Did not want to replace the entire front end.

Here are my notes from an article I wrote a while back for the 30th anniversary of the G/S:

After experimenting with various progressive springs and oils, I went with a factory fork brace, 7.5-weight oil, HPN stiff racing springs and the Race-Tech Gold Valve cartridge emulators, #FEGV-3301 with spacers sized OD 26.5mm x ID 21mm x Height 6.5mm. This has yielded very good results, dampening is vastly improved on both compression and rebound especially with the bike fully-loaded.

My reason for posting this it that Racetech had me machine the two spacers I mention out of metal, and they sit beneath the Gold Valves, on top of the damping tube. Is this the 1" spacers you're talking about?

I don't know if that's what your plastic spacers are for or not. They could be for placement atop the springs, as a pre-load.

My springs were super stiff HPN springs, which stick out of the fork tubes a good 4" or more when uncompressed. Getting the big top bolts/caps in is a real challenge.

It sounds like you have spoken with the Racetech people, hopefully they have told you where this spacer is suppose to sit. Just wanted to make sure.

Ian
 
where this spacer is suppose to sit. Just wanted to make sure. Ian


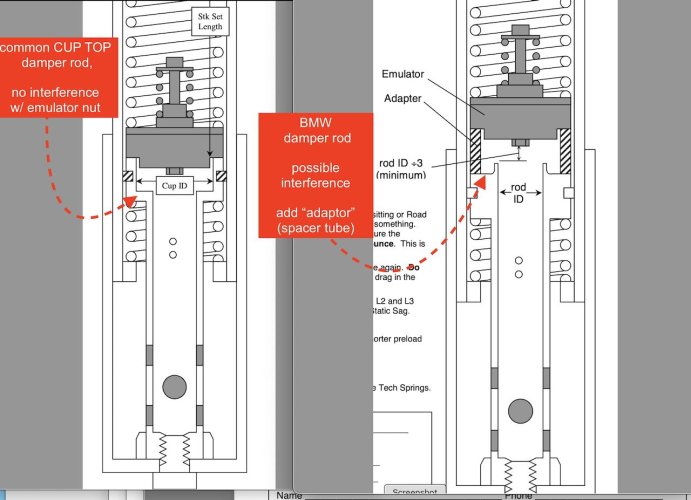
The emulator needs to sit 'sufficiently clear ' of the top tip of the damper rod,
to eliminate any interference between damper rod & lock nut protruding from bottom of emulator.
Iinterference there could create a leak path around emulator's valving.
Also need enough gap to assure no throttle / choke-points against oil flow , up from rod tip through the emulator.

Only a wee bit of clearance is sufficient ( rod ID / 3 )

While many bikes have CUP seats on the rod top ( which allows for non-interference & emulator seating w/out additional parts)
the top tip of the BMW rod will still be a raised stub, , ~1" high , even after "decapitating" the tip for flow purposes.

Thus a spacer required where shown, between damper & emulator

I think the "kit" / BMW specific version (3308) mainly adds a pair of aluminum tube spacers to the box, and while I'm sure its a very nice spacer,
for 80 bucks extra and me being too lathe-poor to make my own, I was going to have MetalSupermarket rough cut some AL tubing ( there is a perfect size stock tube for this) , to be finished @ home by flat sanding,

However the RTech springs came with a heavy wall PVC tube for preload spacer,
which ought to be long enough to take make a couple of these spacers AND for preload spacers.

I figure light wall (sched 40) 3/4 PVC worked well for decades , and there being zero mechanical / duty difference whether a spacer is placed above or below the main spring. (spacer of course usually sits atop of main springs, just to simplify measurements & access )

The OD of the spacer just has to allow sitting free movement inside the fork tube ID,
and the spacer ID has to be large enough to accept the little shoulder on the emulator.

Any spacer requird will ALSO add to the overall spring " height " , as far as preload measurements ( as does the emulator body itself) ,
so that the upper limit to new spacer length, assuming you still want a gap on top, to adjust preload above main spring as usual.

You could easily just make a lower spacer do both the as BMW-specific solution AND the preload spacer, but I think I'll use top and bottom pieces.

Im still presuming the RT springs are short enough to allow for any lower spacer + emulator + and a bit more short for preload tuning (as opposed to your springs that stood out of fork tubes unloaded)


The adaptor needs to seat well enough on the damper rod shoulder to avoid significant leaks between the two pieces
( a leak there could ,again , short-circuit around the emulator / valved path),

so I'm going to grind the plastic spacer & steel damper seat together with a little valve seating compound to assure a well conforming joint.
The main spring presses the emulator & any spacer down tight on the damper tube, so no need to get too too carried away with seating,
as long as the valved path flow is >> than any leak flow, the emulator will do its job

bmw r100 emulator spacer - 1.jpeg
 
Last edited:
...pre load spacers...

Ian


I decided to make my main (above-spring) spacers fit as flush to the bottom of the fully seated (screwed in) fork plugs as possible, basically a 0 preload .
They happened to be about 62mm long (ymmv, main spacer sits on top of the bottom spacer, the gold valve and the relatively short Racetech springs.


That way I can experiment with an actual pre-loading spacer in easily trackable increments
( ie, just have a pair a 5mm / 15mm / 25 / 35 / whatever spacers on-hand to put on top of the 'main' "0 preload" spacer,
when I get to measuring static sag.) Easier to shim up the main spacer ( plain washers are a prefect alternative if you dont mind a stack of steel in there )
than to toddle out & get another set of all-in-ones cut .

I got out of metals supermarket with upper & lower spacers , rough-cut, in aluminum sched 40 tube for about 12 bucks.

Sched 40 tube needed a slight chamfer or inset to seat properly over the gold valves for these 36mm fork tubes (iow , tube ID was too small to accept GV)


haha new comment - I forgot to add spacer L for the sport nacelle supports plates ; always something!
 
Last edited:
I’ve been riding a long time, and understand some bikes have better suspension than others.
Most of the time I just live with it. When it comes time to change fork oil I will sometimes experiment with viscosity to make damping stiffer or more compliant and often overfill a bit for additional compression resistance. Occasionally I have added pvc spacers to compensate for sag, and have replaced slider bushings to compensate for wear but have never fiddled with fork valving.

To date this simple maintenance has kept me from bouncing off the road into the weeds, so my question is: why mess with the valving at all? I pose this question respectfully. Is it really worth the work and expense for the average rider, or is it more of a hobby endeavor? Would the average rider even notice a difference?
 
: why mess with the valving at all?

No offense taken OC !

I have zero time on this suspension yet ,so I'm not a good reference, but I 've heard good things in past about these emulators, Knew some A+ mountain / dirt guys (I would plonk along so far behind that I couldn't even taste their dust ) that were happy with the change and nobody seems to regret doing it , as reported here.

Orifice controlled systems are compromises. To many different situations for the simple design.

Emulator incorporates a slow/round bump circuit ( small oil holes), a fast/sharp bump circuit ( check spring controlling a high flow path ) and an separate rebound / return circuit , which all combined permits springs & oils that actually function in both directions.. Race tech website has better explanations if you wanna , details which made sense to my inner engineer. Be careful reading there if you don't want to be convinced.

I'm clearly a glutton for refurbishment .
 
Last edited:
Back
Top