• Welcome, Guest! We hope you enjoy the excellent technical knowledge, event information and discussions that the BMW MOA forum provides. Some forum content will be hidden from you if you remain logged out. If you want to view all content, please click the 'Log in' button above and enter your BMW MOA username and password.

    If you are not an MOA member, why not take the time to join the club, so you can enjoy posting on the forum, the BMW Owners News magazine, and all of the discounts and benefits the BMW MOA offers?

  • Beginning April 1st, and running through April 30th, there is a new 2024 BMW MOA Election discussion area within The Club section of the forum. Within this forum area is also a sticky post that provides the ground rules for participating in the Election forum area. Also, the candidates statements are provided. Please read before joining the conversation, because the rules are very specific to maintain civility.

    The Election forum is here: Election Forum

‘87 K75S worth reshimming the valves?

evillerich

New member
I've finally gotten around to taking off the valve cover of my '87 K75S. Has a bit over 30k miles on it. A previous owner had painted the valve cover, so it at least came off then. But I spent a lot of time removing RTV sealant from the two channels that contain the valve cover rubber seals. I'll be replacing the rubber seals for the cover, plus the ones on the bolts. Naturally I'll use a gasket sealer at the four joint areas at the corners plus on the new half-moon inserts.

Anyway, I did my valve check and everything came out within spec. But at the low-end of spec. For example, my 0.15mm feeler goes in with just a slight resistance (so does my 0.152) on the intake valves. But my 0.178mm gauge won't go at all. Similar story on the exhaust side but with 0.25mm as the tight end of the range. Given that a wider gaps is generally desirable, I'm wondering if it's worth reshimming the valves.

While I don't ride this bike as my primary, I do want to try to "do it right" and would like to increase my annual miles on it (it's been in a constant state of some restoration since I owned it). I also imagine a future owner may appreciate it, too.

Any advice on whether it's worth it? Or just close it up and wait for the next valve check period? One side of me prefers to just close it up.

Thanks,
Eville Rich
'87 K75S
 
Eville,

I would strongly suggest loosening the exhaust valves to .30 mm. You are currently at the tight end of tolerances. Exhaust valves only get tighter with use.

Exhaust valves get cooled by seat time (they transfer their heat to the cylinder head during the time that they are closed). The shorter the time they are closed, the hotter they run. The hotter they run, the more they tighten up (vale recession). By running them at the loose end of the tolerance you will prolong the valve life. If you are currently at the tight end of the tolerance, how many miles before you are PAST the tight end of the spec?


On the other hand, intake valves are cooled by the cold air/fuel mixture on the intake stroke. They rarely move and are much less of a concern. You can leave those where they are at if they are anywhere within spec.


:dance:dance:dance


Lee,
While I agree completely with going "loose" on exhaust valves, most of the few times I've had to change valve settings on 2-valve K-bikes I've found that if a valve is within the specified range changing a shim will make it either too tight or too loose. IOW, it's a go/no-go situation. How often have you seen this?
 
Greg,

K75 (and 2v K100) valve shims come in .05mm (.002") increments. That means when an exhaust valve is at .25mm (.010") and you replace the existing shim with a .05mm (.002") thinner shim, you will end up with .30mm (.012") clearance. :deal


It is very important that you crank the engine over a few revolutions to insure that the shim is fully seated and any oil is squished out before you remeasure. Don’t let the bike start!!!

Has always worked for me.


:dance:dance:dance
 
Last edited:
Greg,

K75 (and 2v K100) valve shims come in .05mm (.002") increments. That means when an exhaust valve is at .25mm (.010") and you replace the existing shim with a .05mm (.002") thinner shim, you will end up with .30mm (.012") clearance. :deal


It is very important that you crank the engine over a few revolutions to insure that the shim is fully seated and any oil is squished out before you remeasure.

Has always worked for me.


:dance:dance:dance

Lee,
As you say, the thickness increments of the shims *should* allow for that level of adjustment, but I have to admit I don't recall rotating the engine several times, so the oil behind the shim on top of the bucket is likely my problem. The difference I was seeing was very small, so I don't have concerns that I left any valves too tight or too loose, but still: Duh! :banghead
 
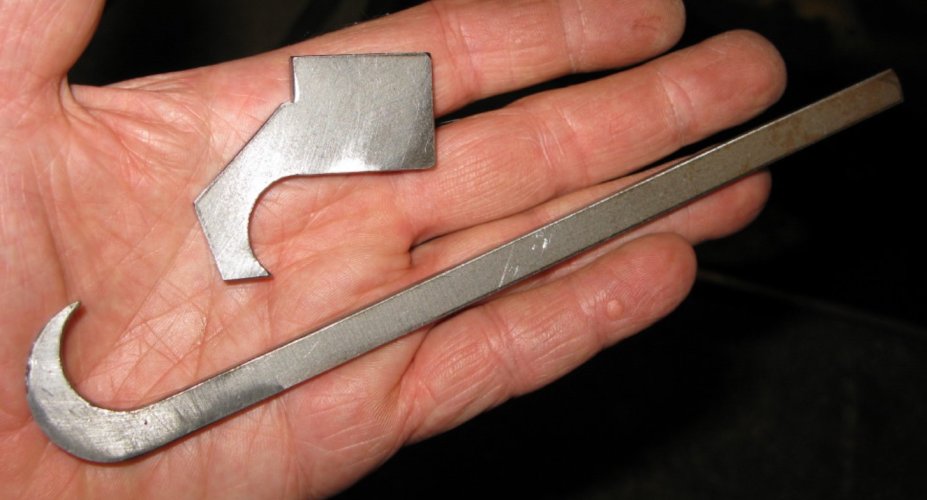
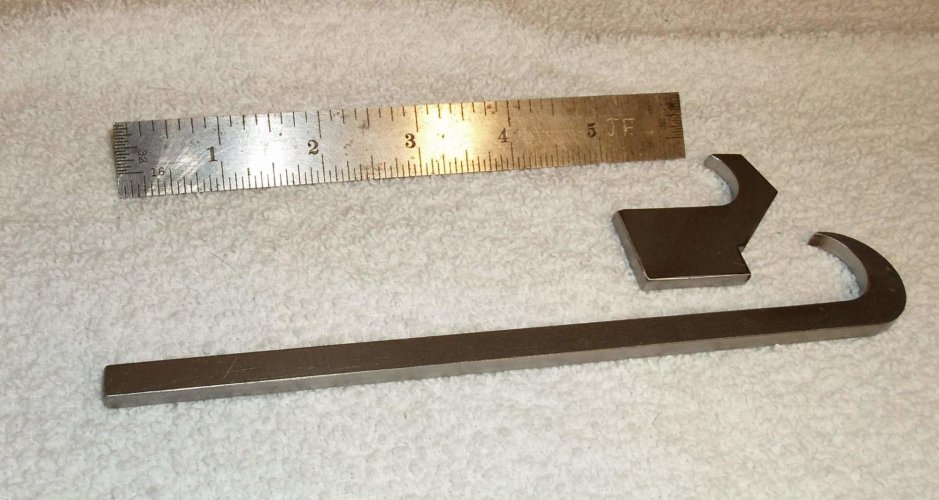
All this talk about shimming the valves of the K75S brings to mind my purchase of my 92 K75S back in 2010. 98Lee met me at the seller's home (it was a fly and buy for me) and spent the day (mostly in the 98Lee garage) educating me about K75S bikes. This education included showing me an easy way to check and adjust the valve shims. Part of the secret is using a tool made by a feller named Kenneth Lively. I obtained one of these handy tools about a dozen years ago based on 98Lee's suggestion.

Today I contacted Kenneth Lively to see if he still had the valve tools. He does. The price was around $30 back then, now it is $35 including shipping. He can be contacted by email at polepenhollow@yahoo.com or via telephone at 847-561-8555.
 
Last edited:
Thank you all for the advice. I tend to err on the side of caution or I wouldn't have even asked the question - just buttoned it up. I'm going to do one more run at the valve check to confirm my measurements and see if I have a 0.16mm or 0.26mm feeler to see just how close I am. And I am more concerned with the exhaust side.

I'll also look into the tool to compress the valves for shim removal. I like new tools and wasn't too excited to try the screwdriver method.

Eville Rich
 
All this talk about shimming the valves of the K75S brings to mind my purchase of my 92 K75S back in 2010. 98Lee met me at the seller's home (it was a fly and buy for me) and spent the day (mostly in the 98Lee garage) educating me about K75S bikes. This education included showing me an easy way to check and adjust the valve shims. Part of the secret is using a tool made by a feller named Kenneth Lively. I obtained one of these handy tools about a dozen years ago based on 98Lee's suggestion.

Today I contacted Kenneth Lively to see if he still had the valve tools. He does. The price was around $30 back then, it might be a bit more now; (I forgot to ask the current price.) He can be contacted by email at polepenhollow@yahoo.com or via telephone at 847-561-8555.

Now you have me going - a tool I don't have! :eek What about this tool facilitates the shim changing? Thanks.
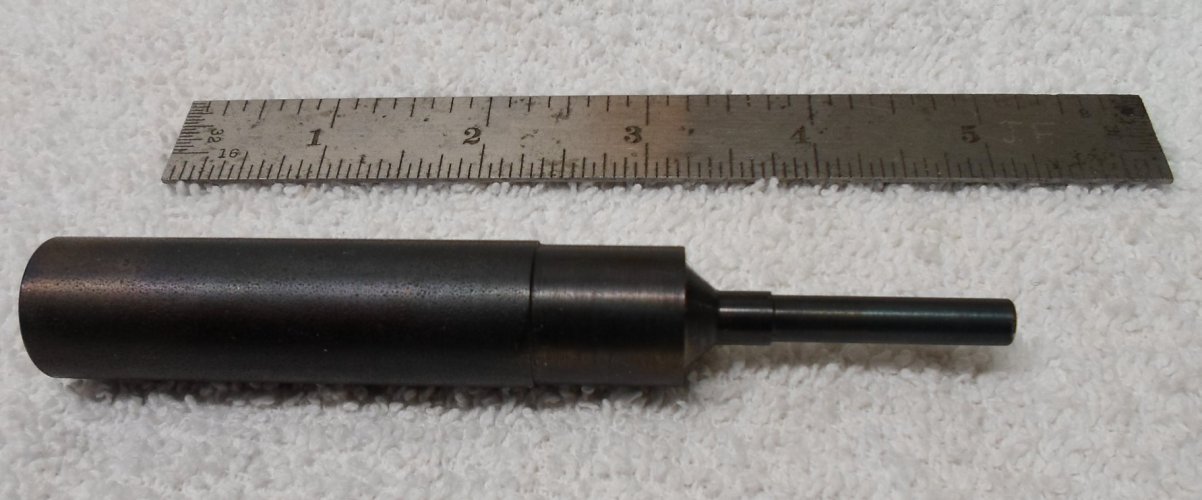
 
Thank you all for the advice. I tend to err on the side of caution or I wouldn't have even asked the question - just buttoned it up. I'm going to do one more run at the valve check to confirm my measurements and see if I have a 0.16mm or 0.26mm feeler to see just how close I am. And I am more concerned with the exhaust side.

I'll also look into the tool to compress the valves for shim removal. I like new tools and wasn't too excited to try the screwdriver method.

Eville Rich


Eville,

Metric feeler gages are less common and more expensive (unless you are in Canada) than a cheap set of SAE automotive ignition feeler gages. Ideally, you’d want a set of angled tip feeler gages. If you remember that factory spec for the intakes is .006”-.008” and the spec. for the exhaust is .010”-.012” (shooting for .011” or.012”) and the shims come in.05mm (.002”) increments, you will have adequate gages on both sides of spec. to see how far off you are. You can then measure the existing shim and calculate the correct new one.


:dance:dance:dance
 
Last edited:
Now you have me going - a tool I don't have! :eek What about this tool facilitates the shim changing? Thanks.
Greg,


Ken’s tools are laser cut copies of the factory style tools, but without the screwdriver style handle. Several years ago, they were in the $30 range while the factory style ones were in the $100 to $150 range.


:dance:dance:dance
 
Lee,
As you say, the thickness increments of the shims *should* allow for that level of adjustment, but I have to admit I don't recall rotating the engine several times, so the oil behind the shim on top of the bucket is likely my problem. The difference I was seeing was very small, so I don't have concerns that I left any valves too tight or too loose, but still: Duh! :banghead

Greg,

FWIW: I just finished doing the valves on my '04 K1200GT. All were in spec except for one intake, for which I changed out the bucket as indicated. This was my 2nd time through the valve adjustment procedure. The first time, after I had replaced a number of buckets and reinstalled the camshaft (only the intake valves were out on that one, and four of the 8 were out of spec), I re-measured the clearances and every one of them was tighter. Apparently, I hadn't turned over the engine enough. After buttoning it all up, I mentioned this to the tech at my local dealership. He said his rule of thumb is to turn over the engine by 7 crankshaft revolutions before re-measuring. I hadn't done that.

So, THIS time, after re-installing the camshaft I dutifully turned it a full 14 revolutions. And sure enough, every single bucket that hadn't been changed out had exactly the same go and no-go points with the feeler gauges, and the one I did change was exactly where it should've been. Live and learn, I suppose... :)

BTW, that first time through (2 years ago): that same technician looked at my feeler-gauge measurements, and two of the intake valves that were off on the loose side of the spec range he said BMW would recommend NOT to adjust. For those two, the 'go' gauge was 0.20mm and the 'no-go' gauge was 0.23mm. So, technically they were out of spec, but not by much. I did as he suggested and left 'em alone. No problems other than a tiny little bit more valve clatter when the engine is cold, which I could live with...
 
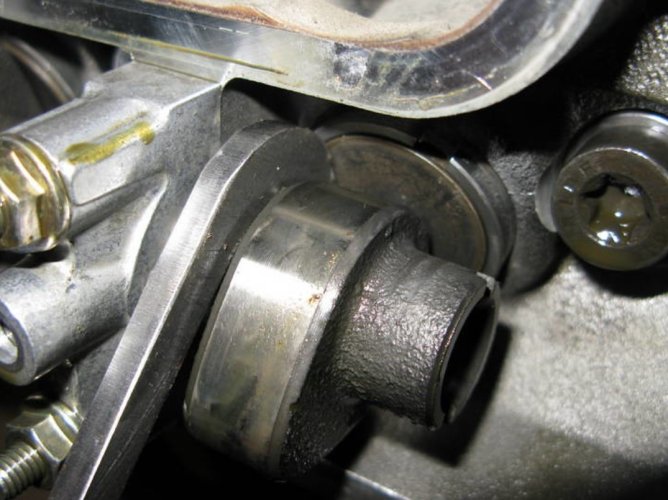
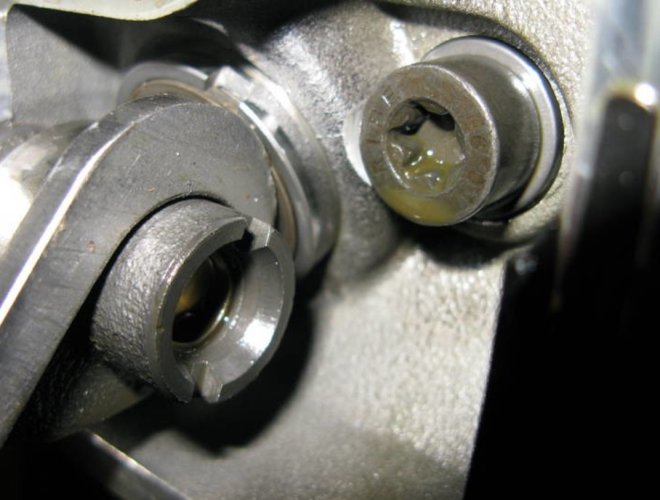
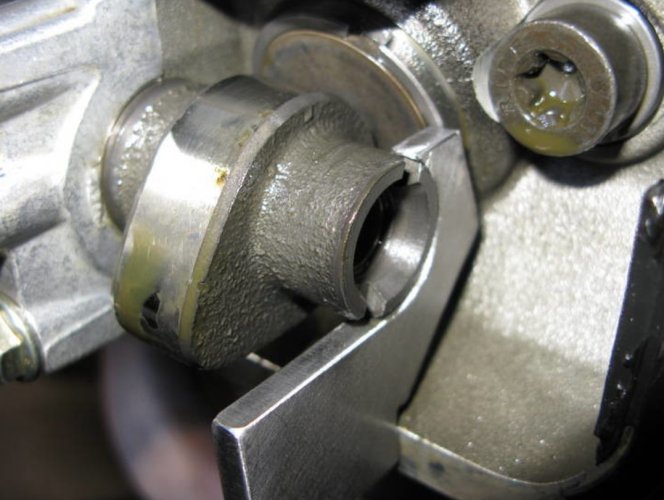
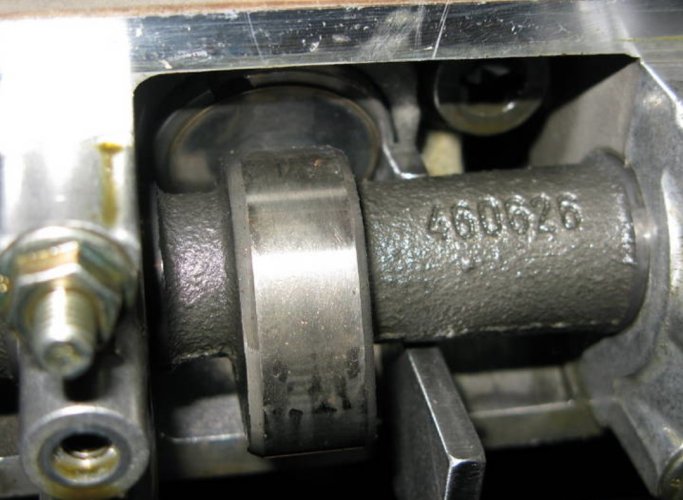
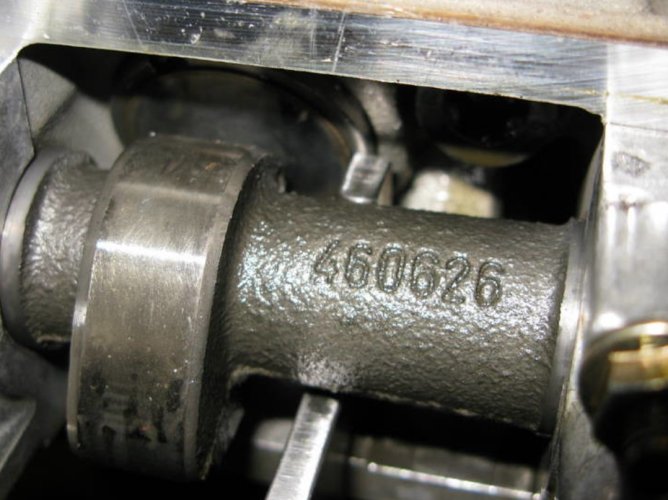
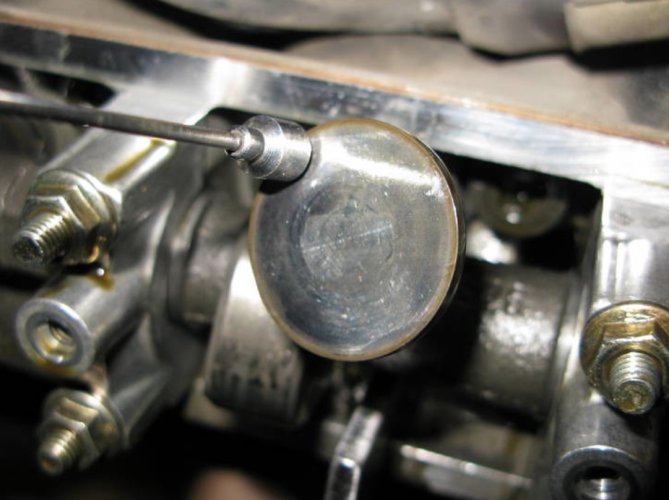
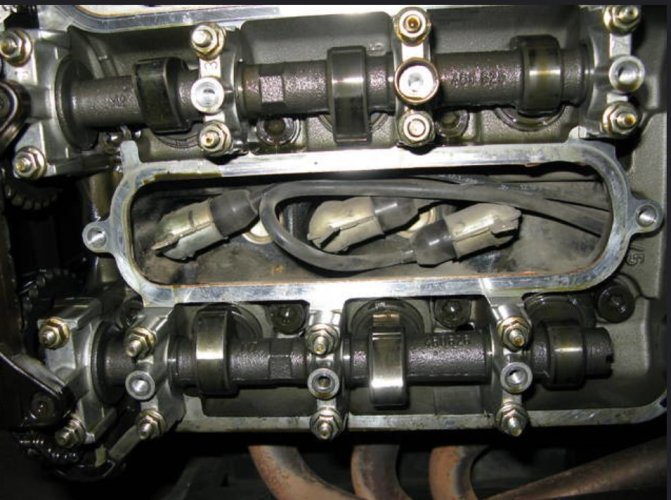
Also on Ken Lively's flicker page were a series of photos illustrating the use of the valve shim tool. These photos are from his web site. I have mostly used similar photo captions. NOTE: In the last photo a small magnet is shown holding the shim. Some folks have indicated that use of a magnet is not a good idea as the shim will become slightly magnetized and subsequently attract small ferritic metal particles. The shim / cam lobe interface is a high wear location and the accumulation of metallic fines is contra-indicated. A more desirable (albeit more difficult) practice is to remove / replace the shim with a tool like a dental pick and tweezers (or hemostat). YMMV!!!

k75s-shim-tool-use-01 rocker cover off.jpg

Rocker cover removed


k75s-shim-tool-use-02 shim tool in hand.jpg

Shim tool in hand


k75s-shim-tool-use-03 cam lobe up tool depresses valve.jpg

Turn engine over until cam lobe pointing away from shim. Place lifting tool around cam.


k75s-shim-tool-use-04 cam lobe up tool depresses valve.jpg

Rotate lifting tool to depress valve, shim, and bucket


k75s-shim-tool-use-05 keeper on bucket edge.jpg

k75s-shim-tool-use-06 keeper on bucket edge.jpg

k75s-shim-tool-use-07 keeper on bucket edge.jpg

Place keeper between cam and bucket, on edge of bucket


k75s-shim-tool-use-08 shim removed-replaced.jpg

Remove and replace shim - see note about use of magnet!
 
I successfully removed my valve shims with a tool similar to the one shown. Worked great. Needed to use compressed air and a wand to get them to come out. Separately labeled and taking to a local shop that does an exchange.
 
Back
Top