• Welcome, Guest! We hope you enjoy the excellent technical knowledge, event information and discussions that the BMW MOA forum provides. Some forum content will be hidden from you if you remain logged out. If you want to view all content, please click the 'Log in' button above and enter your BMW MOA username and password.

    If you are not an MOA member, why not take the time to join the club, so you can enjoy posting on the forum, the BMW Owners News magazine, and all of the discounts and benefits the BMW MOA offers?

  • Beginning April 1st, and running through April 30th, there is a new 2024 BMW MOA Election discussion area within The Club section of the forum. Within this forum area is also a sticky post that provides the ground rules for participating in the Election forum area. Also, the candidates statements are provided. Please read before joining the conversation, because the rules are very specific to maintain civility.

    The Election forum is here: Election Forum

2021 wiring question

awagnon

Member
I bought a used 2021 G310GS (LED headlight). Does anyone know if there is an accessory socket lead pre-wired and zip tied somewhere? I can't find one and there doesn't seem to be the mounting hole for a plug like older models. Ditto for GPS pre-wired plug. Does the LED headlight have a high beam lead I can tap to trigger a Clearwater light to bright? Last of all, what's a good switched power lead to trigger a FuzeBlock relay? I've taken the bike apart and can't find any pre-wired plugs that don't have wires going both in and out of the plug. Thanks.
 
I bought a used 2021 G310GS (LED headlight). Does anyone know if there is an accessory socket lead pre-wired and zip tied somewhere? I can't find one and there doesn't seem to be the mounting hole for a plug like older models. Ditto for GPS pre-wired plug. Does the LED headlight have a high beam lead I can tap to trigger a Clearwater light to bright? Last of all, what's a good switched power lead to trigger a FuzeBlock relay? I've taken the bike apart and can't find any pre-wired plugs that don't have wires going both in and out of the plug. Thanks.

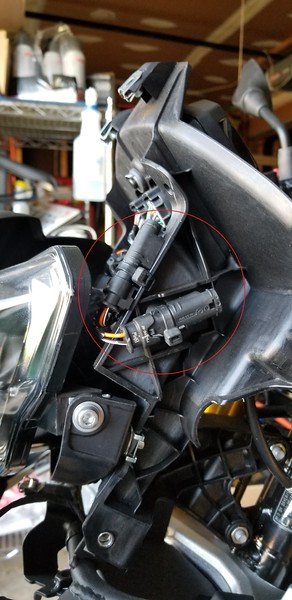
My 2022 had a two prong plug to attach a battery tender to. It is zip tied to the horizontal frame tube on the right side coming out just behind rear shock. I drilled a hole and attached a capped power socket on the left side right behind the 310 GS logo in the plastic panel located up by your knee. There is a yellow (high beam) and orange (low beam) wire you can tap for aux lights under the cowl in the front. Also under the cowl in front are two switched power outlets. Here is an e-bay item https://www.ebay.com/itm/334287557197

There are something like 34 bodywork screws to get to the headlight. They are not all the same. Buy a screw storage container with something like 24 compartments. Harbor Freight has one for $4.99. Cut little squares of paper to fit the storage squares. As you remove screws write on the paper squares where they came from and keep them separate and in the order removed from the other screws. There are several lengths of screws, some have shoulders to fit thru larger mounting holes in the body panels, some don’t. Some have plastic washers, some don’t. The plastic washers are really thin, and easily dropped, you may want to buy better plastic washers in bulk from someplace like Amazon.

1st You have to take off the tank shroud.

Do not remove screws from gas filler cap. Not necessary.
Do not remove two screws from rear center strip of shroud. Not necessary.
Do not remove the screws from turn signals. Not necessary.
Side emblem wings come off individually. Two screws on the outside and one on the inside (rear screw). (6)
Don't take off the wrong screw on the inside, it won’t help you.
One screw at the forward center mount next to the triple tree frame neck. (1)
One screw at the rear under the front of the seat. (1)
Front of Shroud 2 screws in the indent, 2 screws in the top, 2 in the front on each side. (6)
Front of shroud underside on left and right. (2)
Rear of shroud underside on left and right. (2)
You have to spread the shroud at the bottom (away and over the lower mounting points) as you lift it off. You need to rock the shroud a little to the side to clear the upper mounting points. When putting it back on you need to make sure the lower lip on the sides is below the fastening points and not hung up on top. Also there are two little rubber bumpers inside the rear of the tank shroud that fall off occasionally.

Next you have to take off the beak. Elevating the bike makes this part much easier.

There are two screws on each side of the outside of the rear beak. (2)
There are two screws on center underneath the beak. (2)
There are two screws underneath that are horizontal at the front of the beak pointed out. (2)
These are a little difficult. Work from the opposite side on each screw.
I have a miniature low profile bit driver ratchet that I use just for these two screws.
There are two screws underneath pointed up on an angle away from the motor. (2)

Next you take off the cowl.

There are two screws on each side of the inside of the cowl. Use long 1/4 inch extensions. (4)
There are four screws holding on the fly screen. (4)
Do not take the screws from the turn signals. Not necessary.
Do not take the screws from the side of the headlight. Not necessary.
Grab the cowl and lift it away from the headlight. It will fold forward hanging by the turn signal wiring.

If you do this I would appreciate any corrections to the above procedure you have.

Wayne Koppa
Grayling, MI
71,449 Life
 
My 2022 had a two prong plug to attach a battery tender to............

If you do this I would appreciate any corrections to the above procedure you have.

Wayne Koppa
Grayling, MI
71,449 Life

Thank, you, Wayne for the reply and for going to the trouble to write a detailed disassembly instruction. I had all of the plastic off and the shroud over the back of the instrument panel. However, I didn't see the two un-used plugs you mentioned. Also, I wasn't sure which wire to tap for the high beam signal. I put it back together so I could ride. I'm riding out of town all next week, but when I get home I will take it apart again to see if I can find the plugs. I'll also order the connectors from e-Bay. Much appreciated.

Alton

Your welcome.

BMW 310 GS Switched Outlets.jpg

This is what they look like on the left side of the cowl area. They have a protective cap that is removed. I am not sure what fused circuit they are connected to. I used one of the outlets to place a round all weather voltmeter/usb port on the dash. My 2018 310GS had a stator fail so I take a new interest in what is going on there.

Wayne Koppa
Grayling, MI
71,449 Life
 
I used one of the outlets to place a round all weather voltmeter/usb port on the dash. My 2018 310GS had a stator fail so I take a new interest in what is going on there.

Thanks for the picture. I must have looked right at the plug. However, the previous owner had made some changes to the wiring and may have relocated the plugs or even cut them off. He did some weird stuff to the bike. I plan to install a dash mounted combination voltmeter and digital thermometer from Powertec using one of the wires. I too like to know the status of the charging system and whether I'm cold or hot. :=) The second wire will be used for my GPS.

Alton
 
Back
Top