• Welcome, Guest! We hope you enjoy the excellent technical knowledge, event information and discussions that the BMW MOA forum provides. Some forum content will be hidden from you if you remain logged out. If you want to view all content, please click the 'Log in' button above and enter your BMW MOA username and password.

    If you are not an MOA member, why not take the time to join the club, so you can enjoy posting on the forum, the BMW Owners News magazine, and all of the discounts and benefits the BMW MOA offers?

  • Beginning April 1st, and running through April 30th, there is a new 2024 BMW MOA Election discussion area within The Club section of the forum. Within this forum area is also a sticky post that provides the ground rules for participating in the Election forum area. Also, the candidates statements are provided. Please read before joining the conversation, because the rules are very specific to maintain civility.

    The Election forum is here: Election Forum

'04 R1150RT Fuel Sending Unit Repair?

txmxrider

New member
Fuel gauge is stuck showing 1/2 tank. This happened at the same time I noticed the charcoal canister was plugged up and I suspect the lack of venting caused the plastic fuel tank to collapse which dented the sending unit tube. (See photo below.) A new sending unit is $558 dollars. I doubt if I'm the first one to have this trouble so I'm wondering if anyone has ever tried to remove the dents out of one of these? Thinking something along the line of drilling a hole on the opposite side then using a drift to push the dent out from the inside then patching the hole with JB Weld but I don't know what's inside that tube. Has anyone had any luck repairing one of these?
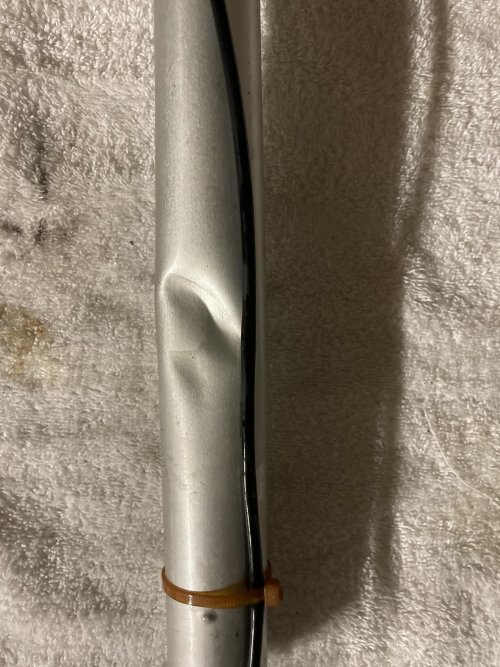
IMG_3315.jpg
 
Box, there is a video showing that exact repair. I think it was done by Illinois BMW Riders, but I don’t have my list of repair videos near me. If nobody else finds it, I will look for it.
 
I've repaired/rewired/cleaned several.
PM me if you are interested.

Whatever you do DON'T drill it.
You risk permanently damaging it.
It has very fine components inside.
 
Thank you so much for the Youtube link! That's perfect. In fact that method looks much easier than what I had envisioned. I'll give it a go tomorrow.

Thanks again!
 
I've been holding off on doing the canisterectomy on my R1150RT until I had a "real" reason for removing the tupperware. Now I'm convinced the canisterectomy is a real enough reason. The next two days are forecast to be rainy, good for some quality time in the garage.
 
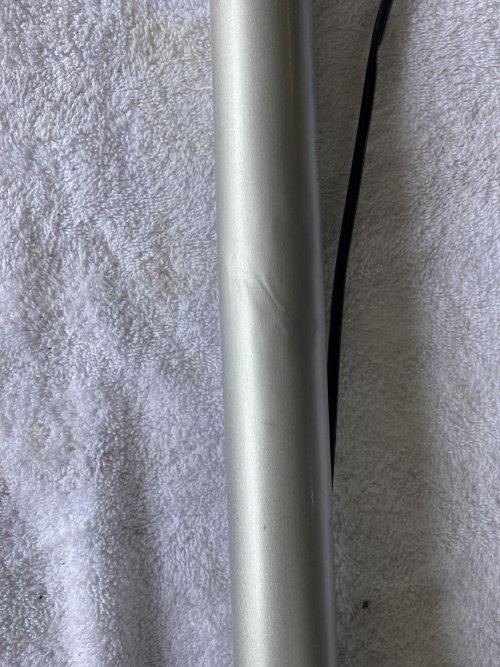
Woohoo! $558 bucks saved! It's not exactly up to Italian coach builder's standards but it's good enough. A 1 1/8" deep well socket worked nicely along with some gentle tapping with a mallet and now the float moves up and down no problem. Turns out it's not a particularly tight fit for the float inside the tube so it doesn't have to be perfect. It seems to me that this procedure only works if you're lucky enough for the float to be trapped above the pinch in the aluminum tube. If it's below the pinch point I don't think you could slide the tube off the float and the guide wires without tearing something up. But I'll take lucky over good in this case.

The video didn't discuss this but I wonder if it's okay to use plain old plastic zip ties to replace the original zip ties that I cut off? Does anyone know if plastic zip ties deteriorate when constantly submerged in gasoline?

Regarding the charcoal canister as the root cause, what tipped me off was when I stopped for fuel one day and opened the gas cap and it didn't just pop open like it usually does. In fact I had to take off my gloves and really tug on it to get it to open and when I did there was a woosh of air *into* the tank. I didn't put it all together at the time. I just thought it was weird and continued to gas up. But afterward I noticed the bike didn't have its usual get up and go and the fuel gauge never moved above or below about half full. After some more riding and thinking through it a bit I stopped and opened the cap and again there was a noticeable vacuum. This time I left the cap unlocked and rode home and pulled the vent hoses off the canister and tried blowing through them toward the tank. All was good there. Then I tried blowing toward the canister and it was plugged up solid. But of course by this point the damage was done. I haven't decided yet whether to do the canisterectomy or not. A new charcoal canister is $150 and while I want to do the right thing for the environment I really don't want to have to go through all this again. On the other hand the original canister lasted 17 years so it's probably not something I'd have to deal with again in this lifetime.

IMG_3316.jpg
 
Great work, that's quite the improvement!

As to the zip ties: Nylon holds up well in gasoline, so much so that you can buy flexible nylon fuel hoses meant for in-tank use. I've used standard black nylon zip ties inside my own gas tank with no ill effects...at least in the short-term. I don't know for sure how well they'll hold up 5+ years later, but by then you're supposed to change all your fuel lines anyways.
 
Thought I'd update this post with some tidbits that I learned that might help the next person if they happen to read this thread.

My original reason for getting into this mess was to find and resolve a fuel leak, figure out why the fuel sending unit wasn't working, and to replace the fuel filter. That led to me having to repair the sending unit as noted above and also removing the charcoal canister. And I used this opportunity to generally rehab the fuel system: replace the fuel lines (internal and external) and install new metal fuel line quick disconnects, replaced the U-shaped rubber hose connected to the fuel filter with a metal pipe from Nushings, and replaced the fuel pickup sock. While I had the bodywork off I also did a general cleanup and replaced the battery.

What I learned:
* First of all, the many Youtube videos regarding fuel filter replacement were quite helpful for general info on how to remove the bodywork, fuel tank, and accessing the fuel pump and fuel filter.
* The U-shaped pipe from Nushings seems like a good idea but it's significantly longer overall than the original equipment rubber hose and this caused it to push the fuel pump pickup sock at an awkward angle. I ended up cutting two barbs off each end of the Nushings pipe to shorten it. That left three barbs for the hose clamp to grip and I'm hoping that will be sufficient.
* I purchased the 13mm fuel injection clamps and external fuel line from Beemer Boneyard.
* The Nushings kit came with a replacement O-ring for the access plate, 13mm F.I. clamps, and enough internal fuel line to do the fuel filter change. So in the end I had plenty of 13mm F.I. clamps left over.
* I also bought a pack of stainless steel 9mm F.I. hose clamps from Amazon for the two internal vent hoses. Here is a word of caution. These hose clamps won't work on the vent line that has the yellow collar due to not enough clearance between the vent pipe nipple and the edge of the fuel tank opening to allow for the clamp. I spent probably two hours flipping that hose clamp every way possible but the assembly would not seat properly no matter what. Ultimately I had to take the tank down to Boxer Works and got them to install an original equipment Oetiker clamp on that one end of that one vent hose. So bottom line, you might as well go all in and buy the correct 8.8mm Oetiker clamps and the crimping tool if you don't already own one.
* The canisterectomy was very easy. Again I followed a Youtube tutorial. I simply removed the canister and plugged the vacuum line with the screw that was left over from removing the canister then I routed the two vent hoses from the fuel tank alongside the other vent hoses on the right side of the frame and secured them with some black zip ties. I also cut a 45 degree angle to the end of the vent hoses to prevent them from sucking water up into the system. I did not remove the purge valve from the left side of the frame. This way if the next owner is a purist and wants to reinstall a new charcoal canister they'll have everything they need except for the canister.

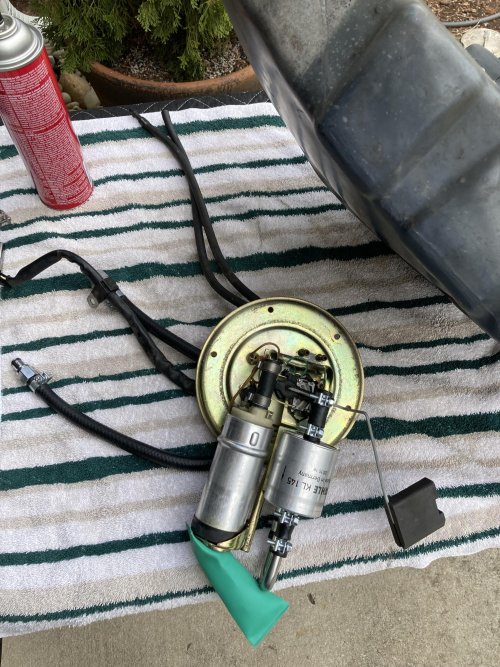
In the attached photo you can see the two vent hose pipe nipples. If you notice, the one at the north end of the fuel filter is closer to the edge of the backing plate than the other. That's the one that requires the Oetiker clamp.

Now I just have to remember how to put the rest of the bike back together!

IMG_3321.jpg
 
Black Zip ties are all you need for the vent hoses.
All I have ever used on that application.
There is no pressure. (to speak of)
 
Last edited:
Back
Top