• Welcome, Guest! We hope you enjoy the excellent technical knowledge, event information and discussions that the BMW MOA forum provides. Some forum content will be hidden from you if you remain logged out. If you want to view all content, please click the 'Log in' button above and enter your BMW MOA username and password.

    If you are not an MOA member, why not take the time to join the club, so you can enjoy posting on the forum, the BMW Owners News magazine, and all of the discounts and benefits the BMW MOA offers?

  • Beginning April 1st, and running through April 30th, there is a new 2024 BMW MOA Election discussion area within The Club section of the forum. Within this forum area is also a sticky post that provides the ground rules for participating in the Election forum area. Also, the candidates statements are provided. Please read before joining the conversation, because the rules are very specific to maintain civility.

    The Election forum is here: Election Forum

Vetter Windjammer fairing Uninstall (1973 R75/5)

Stuff

All the proper colored and gauge wire is available as well as the good factory style terminals, everything needed to make a wire harness, if that is the path to choose. There is no need for scotch lock or AutoZone terminals. I have seen a couple of guys make some very nice one off wiring jobs on bikes. If you have the know how, patience and desire, you don't always need a factory harness.

Many long years ago, I was young and used the shortcuts available to get the job done and working. Some shortcuts are good and work, others not always. I found using scotch lock connectors and cheap crimp ons worked for a while, sometimes the life of the car, but when they failed, (more often than I cared) they made things difficult to repair.

I like the idea of adding a ground wire, my mind goes blank but I believe the /6 I helped install the factory signals on didn't have one. They grounded to the stalk. We did put a short pigtail on each to be sure they were grounded to good metal.

Good luck and enjoy. St.
 
As far as wiring - it all starts with that switch. And that switch is a pita. I replaced mine with a Rocky Point unit which greatly simplifies things. There are some tricks to this so ask if you are going to do this. Annealing the tabs that hold the switch in is recommended.
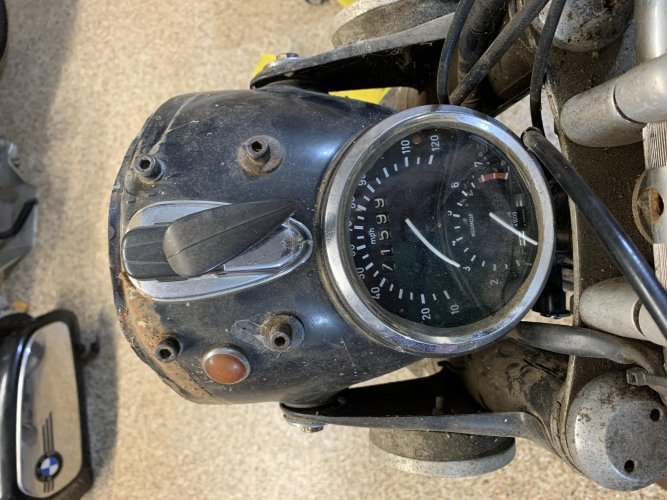
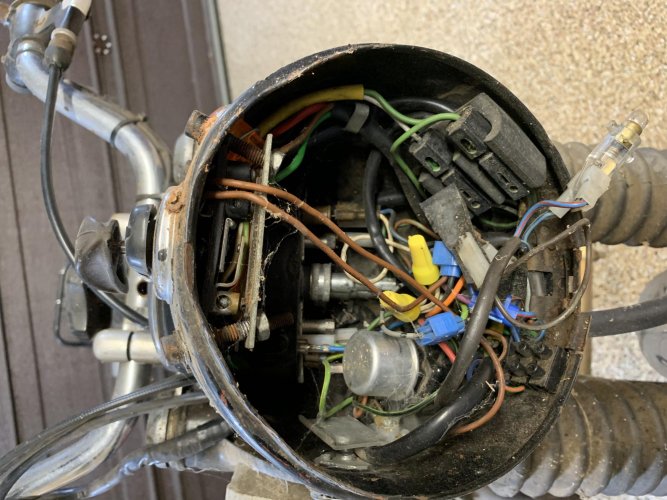
View from the top of the headlight shell. The four hex bolts are what I am curious about.

IMG_5091.jpg

View from the front of the headlight shell.

IMG_5093.jpg

I assume this is an aftermarket switch gizmo of some sort. Thoughts?
 
Ha! Never seen that before! I don't think it's an aftermarket gizmo, but a shadetree fix for a problem. The small circuit board in the headlight of the /5 bikes is held in place by four pieces of triangular metal that are bent around the edges of the circuit board. Those metal tabs can only be bent/unbent a small number of times before they break. They work harden. To fix that, one must use direct heat from a torch to relative the work hardening and add some ductility back to the metal.

In your case, someone just decided to run four bolts through the top of the headlight shell and through the board to secure it in place. I hope they are metric bolts! :wave If the ignition still works, I'd probably leave it alone. But if it doesn't, as mentioned Rocky Point sells a replacement ignition key system as a replacement.
 
View from the top of the headlight shell. The four hex bolts are what I am curious about.

View attachment 85479

View from the front of the headlight shell.

View attachment 85480

I assume this is an aftermarket switch gizmo of some sort. Thoughts?

Good Lord that is ugly. Wow! To me it looks like someone cobbled the original switch onto the shell with the 4 bolts. Working or not, I would remove that and start over. The potential issue is that someone may have gone that route because they broke off the 4 tabs that hold that board on. It can happen if you don't anneal the tabs before bending them back.

I believe one can source a replacement piece that gets welded on but considering all that's going on there (the 4 holes) I would consider looking for a replacement shell that doesn't need so much work. I had a spare but I gave it to another airhead with a project bike. But they are around.

I have started keeping an eye peeled for another shell. Not sure this one is worth rescuing.
 
Wow

Sorry you got bit bad by previous owners disease. If you can't find a shell in the US, there are sources in the UK. Motowerks comes to mind first. https://www.motorworks.co.uk/vlive/Home/index.php. I have ordered from them and surprisingly shipping is not as bad as one would think.

I would also look into joining the Vintage BMW motorcycle club. Perhaps a member there would have parts you are looking for. It will be a good bike when cured. St.
 
Yes, the ‘good’ old days lol. My 71 /5 was the same animal with that ‘key’ and square board plate within the head light shell that many wires then screwed into from below the plate (as I recall). Had one burn out up at a, I think, the bmw national rally back in the day at I think NY. What fun though a dealer located a used panel plate for me and got her back together in no time.

Your airhead group can assist for certain. One would hope that windjammer wiring harness took the wires from the /5 to power the fairing and with diagrams and airhead history knowledge they can undo or direct you. Those old windjammers were great in the day, just a lot of weight as I recall and the fairing mounts could have a weld break now and then :)

Enjoy the ride.
And just a history lesson, that bmw key is sort of like a Nail. You just need something to push down in that hole so the two plates make contact then the bike can start as I recall. The notch in the pin metal of the key simply slide into a ball bearing area (my recall) which ‘locked’ the key into place as it pressed the two plates together. Well that plus the ability to turn the key which as I recall turned on the headlight. Good times for certain.

Bmw bone yard web site might have some items if you need them though the /5 days are long gone.
 
Optical Trick?

I hope I am just seeing an optical trick in the pictures but to me, the speedometer needle looks bent? St.
 
Back
Top