• Welcome Guest! If you are already a member of the BMW MOA, please log in to the forum in the upper right hand corner of this page. Check "Remember Me?" if you wish to stay logged in.

    We hope you enjoy the excellent technical knowledge, event information and discussions that the BMWMOA forum provides. Why not take the time to join the club, so you can enjoy posting on the forum, the club magazine, and all of the discounts and benefits the BMWMOA offers?

    Want to read the MOA monthly magazine for free? Take a 3-month test ride of the magazine; check here for details.

  • NOTE. Some content will be hidden from you. If you want to view all content, you must register for the forum if you are not a member, or if a member, you must be logged in.

Oil head valve adjustment question

jpm1074

New member
Going to do a valve adjustment on my R1150GS and don't have a lot of experience with boxer motors. Purchased feeler gauges from wunderlich watched several videos on youtube on the subject and still have a couple of questions. When you find the "OT" mark on the flywheel via the inspection hole, are both cylinders at top dead center? Do you adjust the valves on both cylinders at that time?

Thanks in advance for input.
 
Both are at TDC but only one side can be adjusted.

You need to read up on this.
I'll try to find a link for you, there are many.


Edit: I can't find the one I'm looking for. If you look around here for a while you'll find a wealth of information.

Tip:
- You don't need to find TDC by removing the inspection plug, you can instead look at the arrows on the cam drive sprockets.
 
Last edited:
Thanks For the quick response! Watched a ton of videos on YouTube and most only show adjustments on one cylinder and don't mention the other cylinder. I also purchased a service manual for my particular bike and the instructions are vague at best. Can you elaborate on the cam gear markings a little more?

Thanks, J.P.
 
1. Set timing mark to OT
2. Remove both valve covers.
3. Identify the side (left or right) where you can feel slight play in intake AND exhaust valve rockers. Verify by observing that on the other side all valves/rockers have no gap.
4. Adjust the valves on the side where you observed the play/looseness/gap.

THEN
5. Rotate the engine clockwise from the front exactly ONE full revolution until the OT mark again appears centered in the window.
6. Verify that the valves on the side you just did are tight, and on the side you are about to do are loose.
7. Adjust the valves on the second side.
8. Reinstall valve covers.


+1 for Paul
 
I would never disagree with Paul, but I will heartily agree with you bikerfish!
Cam arrows are the best way to avoid accidently pushing that inspection hole plug into the engine.
Not a big deal if you do, but ...
 
I would never disagree with Paul, but I will heartily agree with you bikerfish!
Cam arrows are the best way to avoid accidently pushing that inspection hole plug into the engine.
Not a big deal if you do, but ...

Yes - that works.

As for the timing hole plug. I use plugs from Airheads. Fit tight, won't push through. And explaining OT centered in the hole is a lot easier than trying to explain over the Internet the marks and arrows on the cam sprockets that are often stamped a few degrees off anyway.

For the old timers, I could have explained how to find TDC using a wood pencil through the spark plug hole too - but for somebody doing this the first time, OT centered in the hole is the least error prone method.

Flame suit on.
 
Hey JTM, the fun doesn't end with the valve adjustment. It is a good idea to synch your throttle bodies afterward. Also, pay close attention to using the two feeler gauges, if the valves are off and the synch is off a bit, you will notice it when the bike is running. The 1150RT has an issue with that called surging. I have found that when the valves are done just right, she runs very smoothly. If not, well that means another valve adjustment. Don't let this get you stressed, it is you learning and finding that sweet spot.

Here is a video for doing the valve adjust. Utube has a good library of videos available.

http://www.youtube.com/watch?v=B8jxG1CH8tc

http://www.youtube.com/watch?v=ndMgHakBkKg This is part 1....... (2 parts Includes initial 600 mile cyl head torquing)
 
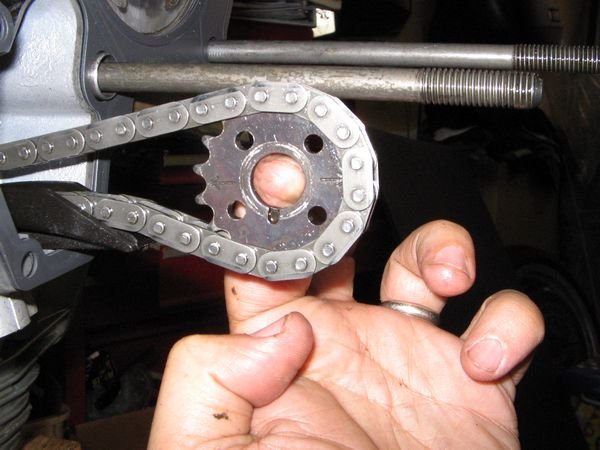
tn_IMG_0343.JPG

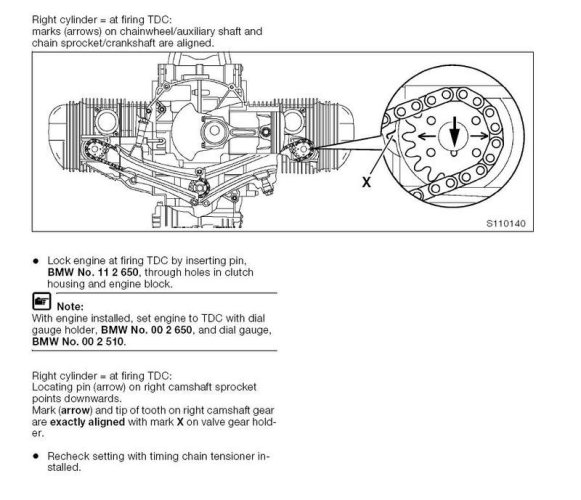
The sprocket is harder to see when it is installed, but not that difficult. You're looking for the arrow, pointed outward - horizontal.

If you grab hold of the exhaust rockers with your fingers, one side of the engine will not move or flex at all, on the other side you should hear or feel a little click and you should see the oil on the adjuster get squeezed or pulled a tiny bit. The side that clicks is the side that you adjust both intake and exhaust. Once done, rotate the engine so the arrow on the other side is pointing out. Now that side should have a click/movement and the side you just finished should feel solid and unmovable.
 
View attachment 37131

The sprocket is harder to see when it is installed, but not that difficult. You're looking for the arrow, pointed outward - horizontal.

If you grab hold of the exhaust rockers with your fingers, one side of the engine will not move or flex at all, on the other side you should hear or feel a little click and you should see the oil on the adjuster get squeezed or pulled a tiny bit. The side that clicks is the side that you adjust both intake and exhaust. Once done, rotate the engine so the arrow on the other side is pointing out. Now that side should have a click/movement and the side you just finished should feel solid and unmovable.

I'm pretty sure I'm not the only one who gets confused about these TDC sprocket posts so I'll toss in a bit more info.
It is helpful to note that m_stock10506 is holding the right side cam chain sprocket and the photo is taken from the rear of engine. (At least I think he is!) TDC RIght Cylinder.jpg
 

Attachments

  • TDC RIght Cylinder.jpg
    TDC RIght Cylinder.jpg
    65.6 KB · Views: 225
Timing hole plug installation

Losing is never an issue if you center it to the bottom of a small hammer handle with a dab of grease.
Orient the oval correctly and push squarely over the hole. It will pop in easily and there is no risk of pushing it thru.
Came up with that years ago. No issues.:D
 
I can't tell from your post if you have ever done a valve adjustment using the arrows. I have done it that way for years and it is very easy and simple and nothing other than the valve cover needs to be removed.

+1. arrow is totally visible, and you're removing nothing extra beyond what you have to remove to do the basic adjustment anyway.

(fwiw, i used to be a timing plug cover remover myself. until someone posted on Pelican about the the cam arrow. i tried it, said "wow, that was easy" and have not looked back since.)
 
Back
Top