• Welcome, Guest! We hope you enjoy the excellent technical knowledge, event information and discussions that the BMW MOA forum provides. Some forum content will be hidden from you if you remain logged out. If you want to view all content, please click the 'Log in' button above and enter your BMW MOA username and password.

    If you are not an MOA member, why not take the time to join the club, so you can enjoy posting on the forum, the BMW Owners News magazine, and all of the discounts and benefits the BMW MOA offers?

  • Beginning April 1st, and running through April 30th, there is a new 2024 BMW MOA Election discussion area within The Club section of the forum. Within this forum area is also a sticky post that provides the ground rules for participating in the Election forum area. Also, the candidates statements are provided. Please read before joining the conversation, because the rules are very specific to maintain civility.

    The Election forum is here: Election Forum

Pre-trip check

mtlla70

New member
I am planning my first 1000+ mile trip since getting my '98 R1100RT (56k) earlier in the year. It has been running great.

At the end of 2013 (55892 mi), it had the following done:
- trans oil change
- final drive oil
- new plugs
- alternator belt
It was then ridden maybe 500 miles until...

At the end of 2015, it had the following done:
- ECU changed
- new fuel pump
- new breather tank hoses
- plugs replaced
- Oil and filter change
- Valve adjustment

Then I bought it and have put about 2k on it since February; it now has 58600 mi.

I would love some input on what I should check before I head out. I know to check oil, tires, brakes and shock preload, but is there anything else recommended?

Thanks!
 
I am planning my first 1000+ mile trip since getting my '98 R1100RT (56k) earlier in the year. It has been running great. I would love some input on what I should check before I head out. I know to check oil, tires, brakes and shock preload, but is there anything else recommended?

Thanks!

Has your HES (Hall Effect Sensor) been upgraded/rewired?
 
No, I don't believe it has...

Well, if it hasn't already, you DO want to get this done. There are people on this forum who can do this for you at a fraction of the cost a dealer would charge. And, using simple hand tools, its really quite simple to remove and replace yourself.
 
HES...Spare

GSAddict here does mine. I always carry a spare. I have had to use one on my bike and I have been able to help others out who did not have a spare with them.
 
The tension on the alternator belt should be checked about 6,000 miles after installation.
After that, no further checks necessary until it's time to R&R it again.
 
The tension on the alternator belt should be checked about 6,000 miles after installation.
After that, no further checks necessary until it's time to R&R it again.

I check them after 1000 miles if possible. They do stretch slightly initially and will squeak on cold startup if not re-adjusted.

It is interesting the the OE manual has the following stated:

Renew Poly-V belt *)
renew Poly-V belt every 60 000 km (36 000 miles); do not adjust
 
With that kind of miles check for play on the rear wheel, pivot bearings etc. Bike on centre stand, bike in neutral, put your hands at the 9 & 3 o' clock position and push and pull to see if there is any play, and then place your hands at the 12 & 6 o'clock position, push and pull and see if there is any play. If you feel any sideways or up and down play, then do a search on this site or just use Google. Lots of info out there on this topic and no need for me to repeat.

If everything is fine with the above checks and the pivot bearings haven't been physically checked, in the life of the bike, then put that on your to do list when you get back. Enjoy your trip.
 
If I read your post correctly, it appears that the 2013 (55892 mi) service was done prior to you buying the bike. It did not include a brake-fluid change and there is no mention of one since, so we should likely assume that the brake-fluid is at least 4+ years old.

Time for a fluid flush/change to be on the safe side. as much to avoid/stop internal corrosion from moisture contamination as anything else.

If the bike still has the original black rubber lines they should be replaced with SS Teflon ones before riding anywhere.
These rubber lines are a major safety concern - they either balloon without warning and/or deteriorate inside and block the braking system & ABS Pump.
 
Thanks for all the input. Very helpful..!

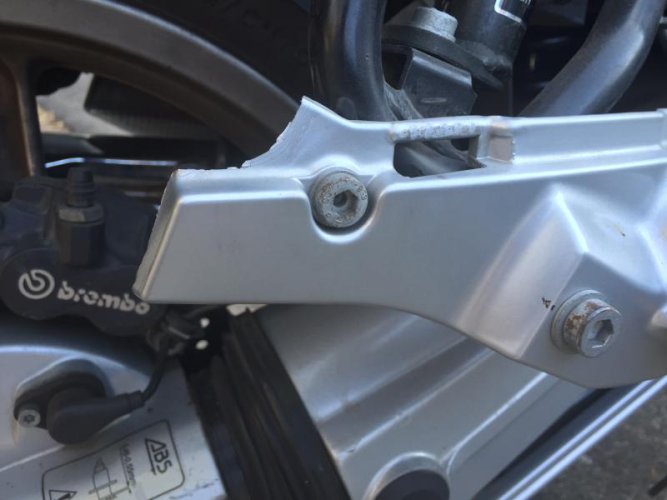
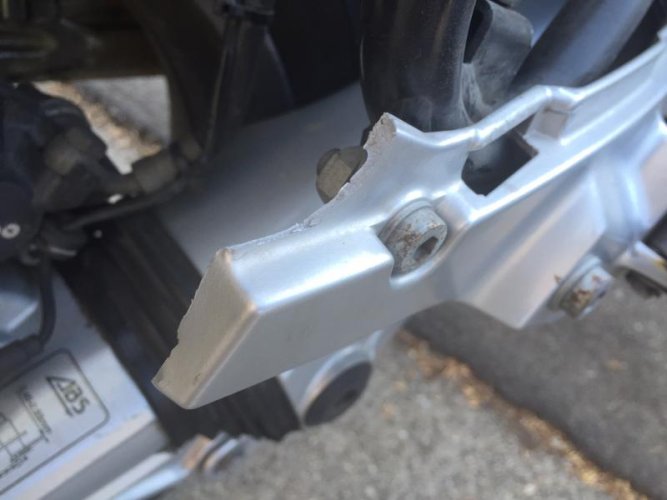
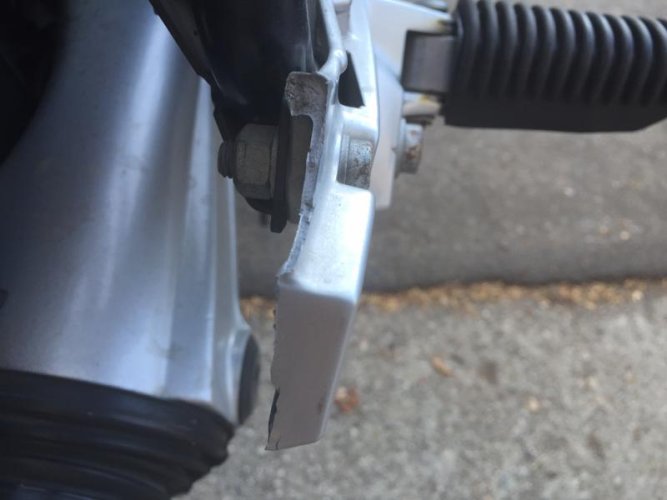
Also, upon checking to see if there was any play on back wheel (none!), I noticed that the rear tip of my right side footpeg mounting plate is snapped off (a previously unnoticed result of a little accident I posted about a few weeks ago). It is all good, except that the little support for the bottom of my side case is now gone - the truck that swiped me hit the side case and I see now that it broke the tip of that plate.
Anyway, the case is still on there strong, but it hangs just a bit closer in than it had. It doesn't seem like a big issue, and I would rather not spend the $430 for a new plate. Can anyone think of a way to rig a little extra support until I can find a used one? (Beemer Boneyard etc have none in stock)

Thanks again!

Pictures of where its broken off would help.I have repaired a couple with aluminum backing and SS pop rivets.
It also can be welded with a new piece, I can send you the plastic cap for the cost of postage.

You may want to email Joshua Buck and ask if he has a used one. I have sourced used from him. Good guy.
PM'd you his email

Another place to check - http://www.re-psycle.com/

Great thanks! Any help would be fantastic! Here are a few pics:

IMG_0991.jpg

IMG_0992.jpg

IMG_0993.jpg
 
If you have some shop skills you could use the steel frame tab behind as a support to make a custom bracket.
I may not look as slick as original but would provided the needed support for the bottom of the sidecase.

Hmm. I have no real shop skills, but it might be time to start acquiring some. There is a DIY garage not far from me, and now I have a perfect excuse...

Thanks!
 
Hmm. I have no real shop skills, but it might be time to start acquiring some. There is a DIY garage not far from me, and now I have a perfect excuse...

Thanks!

You will want that lower bracket, either the original set up or something that you can cobble together to make it work. Without that lower bracket the bag will fall off because the upper tags are not strong enough to support the bag with no lower peg. You can certainly drill that broken lower bracket in a couple of places, and attach a length of aluminum ( you can get it in rectangle/square stock, look for something slightly narrower than the bags receiver portion ), or use steel and then use an old inner tube or something rubber or similar to wrap the end that will fit up into the bag. Attach the other end via a couple of bolts to the lower broken bracket and that should support the bag for your 1000 mile trip. You will want to use either small rectangular or square stock for the lower bracket so that it is rigid side to side. If you use flat steel or aluminium it flexes too much, unless you use very thick stock. Make sure you mount the bag to get your measurements and cut the metal a bit longer than you need, because you can always shorten it, but tougher to make it longer. Once you have the bag on your makeshift bracket leave it on the bike until you get home. Taking it on and off will just bugger up the rubber portion of your repair.

The above nay not look pretty but it will work in a pinch. I'm sure others will offer some other alternatives.
 
Hmm. I have no real shop skills, but it might be time to start acquiring some. There is a DIY garage not far from me, and now I have a perfect excuse...

Thanks!
If you still have the piece that broke off, I think it could be TIG welded and would not be to homely.
OM
 
Back
Top