I TRIED TO POST THIS TO THE DIY TECH FORUM - MAYBE AN ADMINISTRATOR CAN MOVE THIS POST THERE.
DDMTuning HID R1200RT Install Guide, Low Beams, 2008, H7 bulb
INSTALL DATE MAY 2016
There are many posts on the this forum (and other forums) discussing the merits and drawbacks of installing HID lighting in your low beams - including bulb color, canbus issues, wiring, reflectors, failures, manufacturers, etc - it is not the purpose of this Install Guide (IG) to rehash these issues as a search of of forum(s) will provide you with ample ideas regarding lighting options/advantages/drawbacks; rather, this IG will provide a bit more on the 'how to' side to hopefully convince someone on the fence regarding a DIY HID install that this is a project they wish to tackle. Also, this IG provides guidance current as of MAY 2016.
BIKE: 2008 BMW R1200RT (although likely applicable to many other models and years which is why I posted to the Technical Files section).
HID: DDMTuning(.com), #DDM35WH7, Qty 1 (they come as separate lights with separate wiring harness and ballast for each light), DDM HID Kit, 35Watt, H7 Bulb, 4500K, $30(total for 2 lights) plus $14 shipping (ship straight from China via USPS - supplied with tracking number so you can note shipping progress - took about 7 days to arrive at my California West Coast destination - guessing it would take longer if you are inland). Some say DDM Tuning products are CHEAP - I prefer the term INEXPENSIVE - why, well they are made in China of course but mainly because they are made in high volume for CARS (who just happen to use H7 bulbs also) plus they come with a lifetime guarantee - so save your old H7 bulbs in case you need them as you can't get a replacement UNTIL you send back the defective bulb and a new unit is sent to you. They don't come with instructions but there are some online - not sure that they help much so I have not provided any links.
BACKGROUND: Most call this installation easy. For me it was easy BUT took me all day. The electrical is 'plug and play' - but the mechanical side takes the time.
TOOLS/SUPPLIES: drill, 1inch diameter hole drill (to drill hole in center of plastic low beam cover cap), flat file (to file lettering flat on cap to provide best grommet seal), half round file (to chamfer plastic burrs around hole), round rat tail file (to file dog ears in both cap and spacer to pass DDM Tuning electrical connector), electrical tape (to wrap connections between OEM bulb male power to the DDM female power - my BMW has lots of miles a prior repair was made by soldering new connections and the wire at the bulb had actually disintegrated and/or the plastic OEM connector at the bub had disintegrated), volt meter (to ensure that YELLOW wire is positive and connected to the DDM RED wire and the BROWN wire is negative and connected to the DDM Tuning BLACK connector), 0.05 inch diameter wire (to wire the ballast to the bike), torx srew drivers (to remove panels), two annular spacers (used on grommet to ensure an even better seal for the bulb dust cover cap - I used my local ACE Hardware to get nylon white plastic rings, 1.5 inch OD, 1.0inch ID, by 0.084 inches thick - other types of spacers would work just fine but they likely need to be in the range of 0.05 to 0.08 inches thick to allow a superior seal - if you desire same), a bungee cord from which to hang left side fairing panel, small tin snips to cut the clear plastic protective bulb cap base off the DDM harness.
INSTALLATION STEPS:
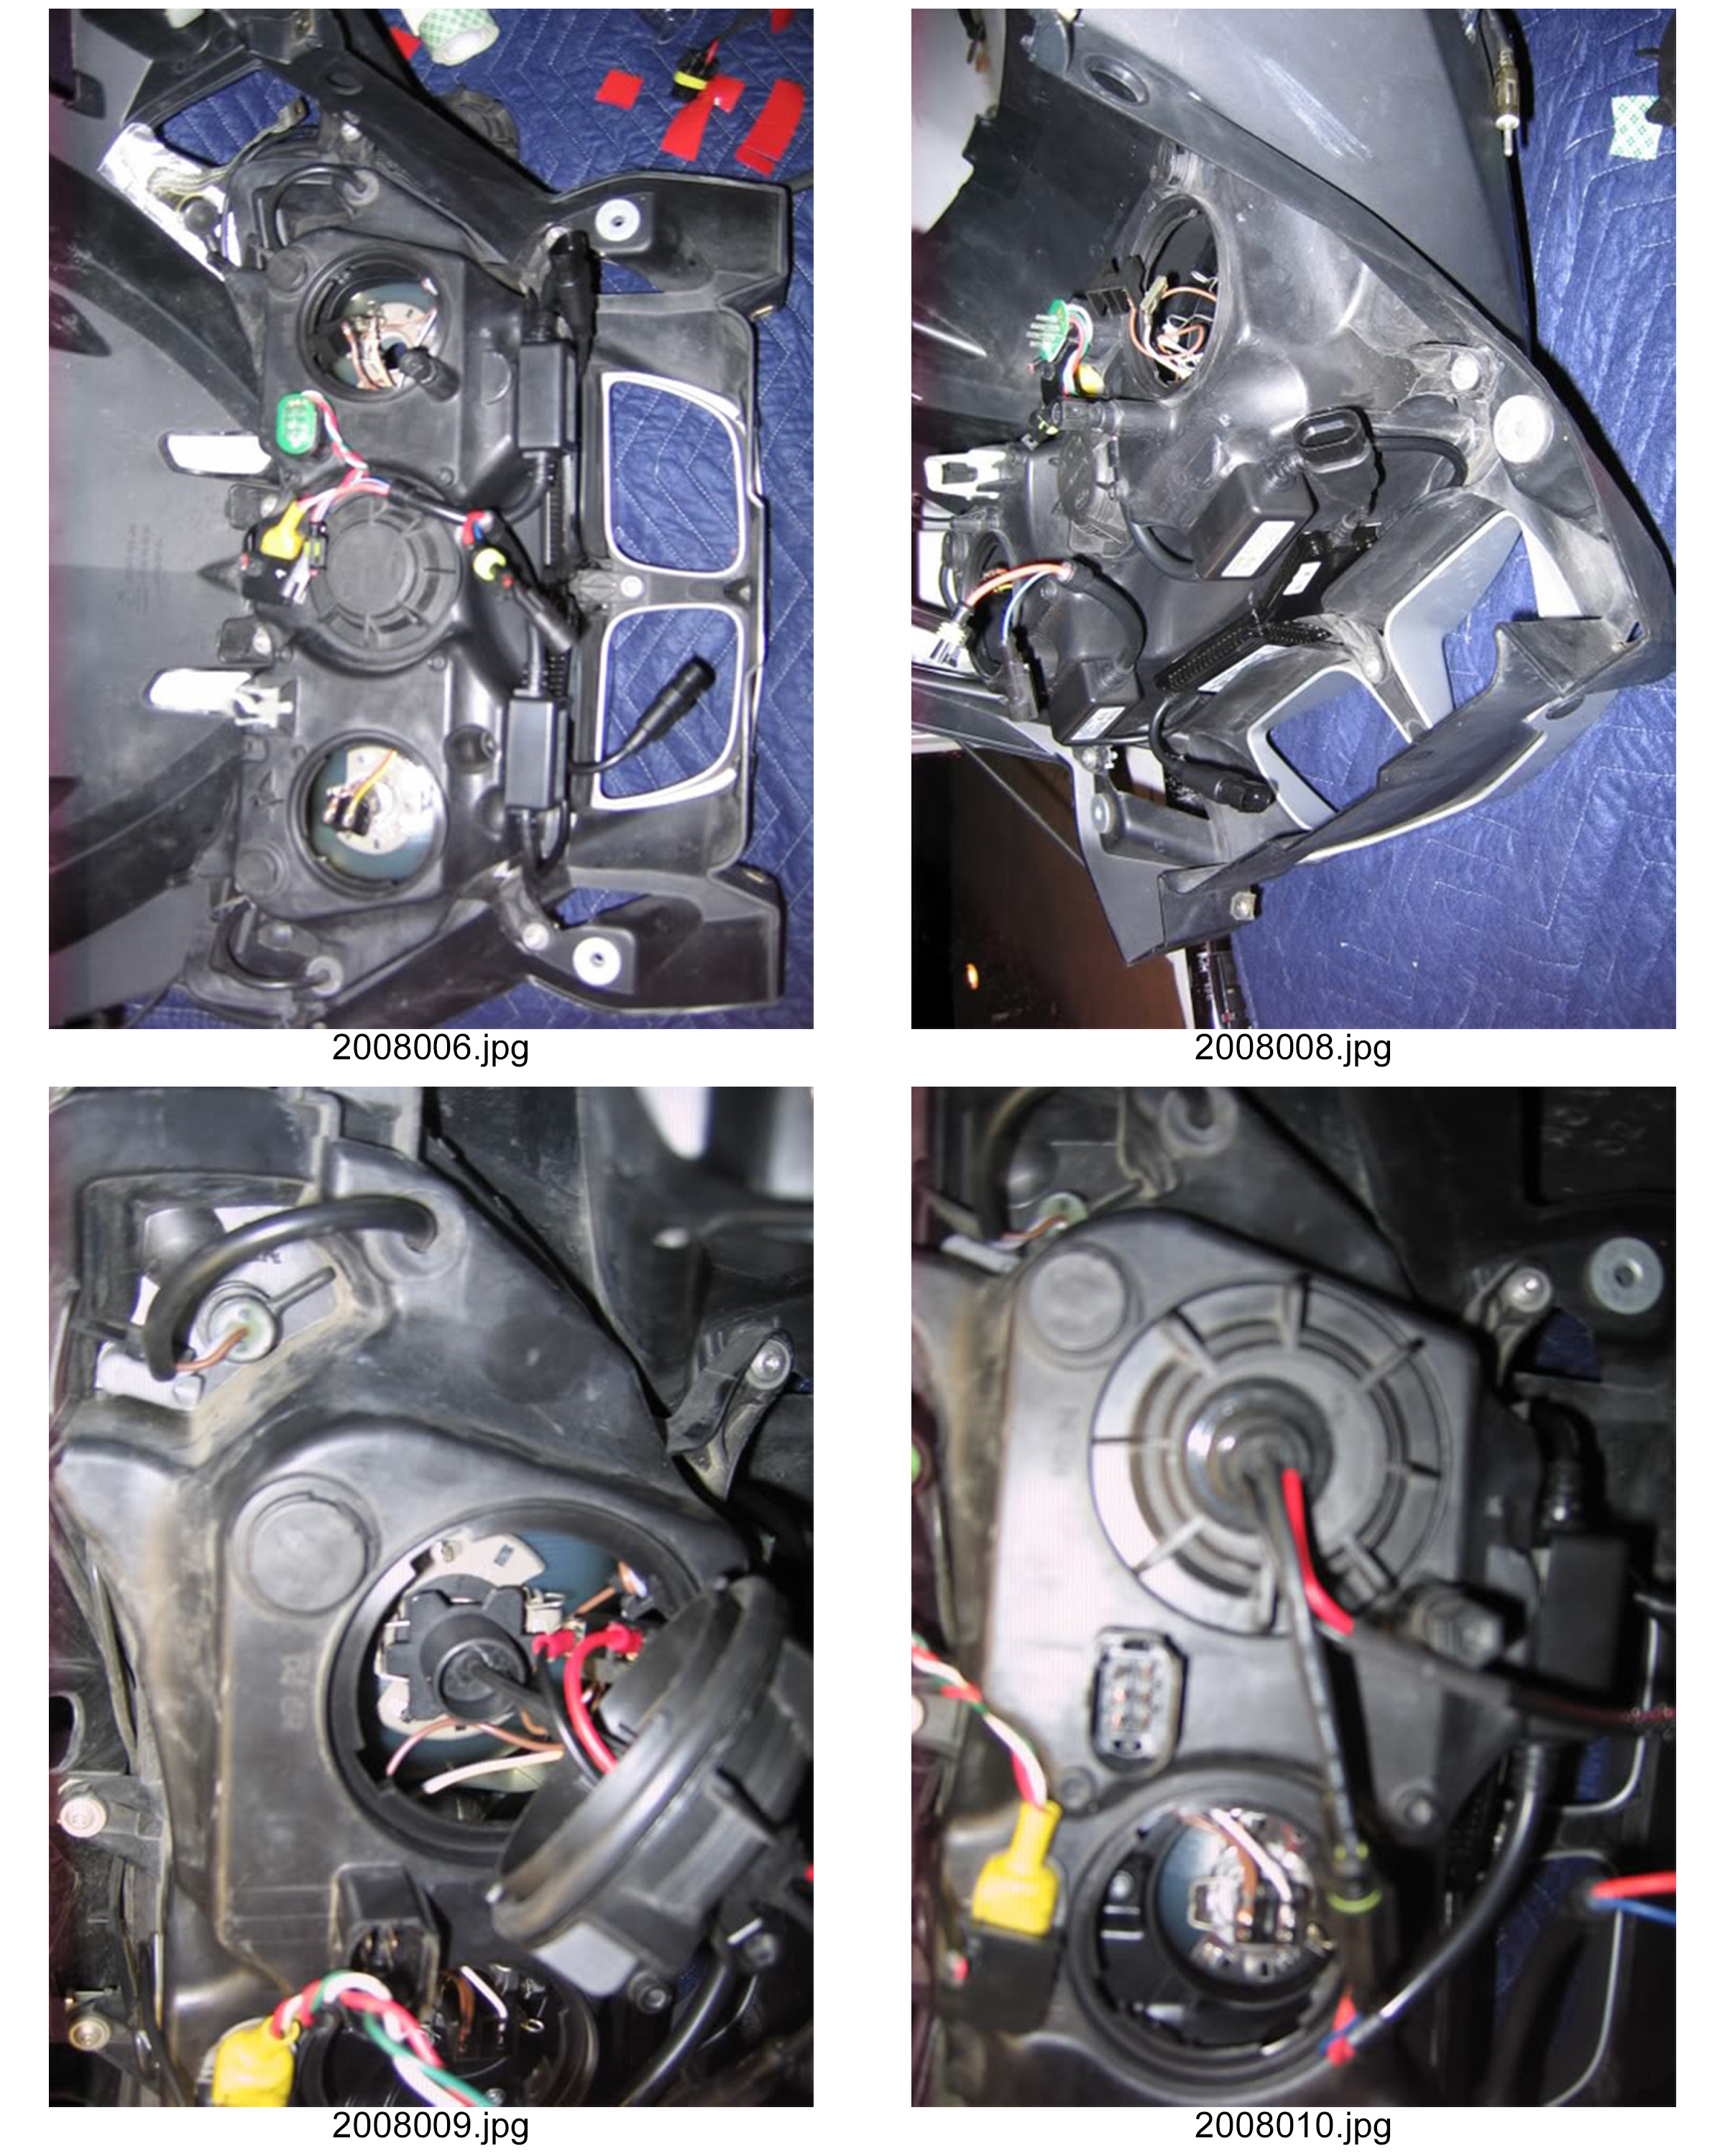
1. Parts Removal - Remove both mirrors by pulling them off, remove both side fairing panels (I hung the left panel from my bike with a cord to avoid removing the electrical plug which is always a battle for me), and remove dash cover. This can be done by using your torx driver in a few minutes and is essential IMHO to an easy(ier) installation as you can then see what you are doing and prevent any bulb damage during installation plus you have lots of room for your hands. Remove both dust covers, remove the H7 wiring connection, remove the spring clip holding the H7 bulbs, remove both H7 bulbs (keep your fingers off them - don't use gloves as best to have feel of your fingers - clean them with alcohol if you touch them with any part of your body and/or grease/dirt - save these H7 bulbs for possible future reuse).
2. Parts Modification - Drill a 1 inch diameter hole in each cap. On the caps and the spacer file out some dog ears 180 degrees to each other, about 0.07 inches across the diameter and about 0.3 inches wide (just enough to pass the DDM plug - enlarge photo to see this detail). File any lettering on dust cover cap smooth so the grommet seals well to dust cover.
3. Ballast Install - Wire (I used nominal 0.05 inch diameter wire) the ballast (via there mounting holes on ballast) to the cross braces on the back of the speaker covers (or find some other suitable location sufficiently close to connect the ballast)
4. Bulb Install - Remove the plastic clear screw cover protecting the HID bulb and snip off the clear plastic case. Install the HID bulb (don't use gloves and don't touch the bulb glass to you or to anything) while looking at the rear then in through the front of the headlight so you can be assured all is properly aligned - you can feel the bulb taps seat - but just barely - so look in the front also. Secure the retainer clip, plug the OEM wires (female) into the DDM wires (male) - then put some electrical tape onto the connectors as may be necessary. Pull the spacer onto grommet and then push it through the modified dust cover (spacer stays on inside). Screw on the dust cover. DON'T put dust cover onto grommet until bub has been installed as it makes it much harder to position bulb if the dust cover is on grommet.
5. Assembly - Put the dash board cover with ballasts loosely (do not screw on just yet) into place and then connect the three DDM water tight plugs together - make sure they each make a clean 'snap' together so they can not come apart. There is sufficient cable slack but connecting them is so much easier if dash cover is loose.
6. Test - Put bike in neutral, start it up, and test that your lights come on OK. Mine did - hope yours do!
Replace Parts - Fasten dash cover, install fairing panels, and push side mirrors back on.
7. OEM H7 Reinstall: If my HID unit(s) should fail I plan on replacing them with the original OEM H7 bulbs I removed - until I can get a replacement. I would do this by removing all the parts as noted in Step 1 as it would be so much easier for me than to risk damaging a bulb or to loose any more knuckle by trying to take a short cut approach - but each to his own.
PHOTOGRAPHS:
The following photo shows the DDM lights with the top part of the photo showing a completely connected unit (bulb with clear protective cover not yet removed, DDM low voltage supply the connects to BMW female connections, dust cover with grommet and spacer connected to cover, and ballast with three watertight DDM plugs. The bottom part of the photo shows the holes in the DUST COVER, the SPACER, and the grommet (the spacer is mounted inside the dust cover on the left such that the rubber grommet provides a good seal onto the outer portion of the DUST COVER.)
.JPG")
The last photo shows the ballast mounted onto the back side of the speaker dash cover.
.JPG")
So far I am pleased with my DDM Tuning HID lights - no canbus issues (yet) and plenty of side light (helps greatly navigating road bends and seeing critters in the dark). These HIDs are great for daylight riding as you are easily seen (compared to OEM lights) AND folks often pull over to allow you to safely pass. As others have done I am planning on replacing my High Beam with an OSRAM Rallye 65W Ultra Output H7. The methods in this procedure are just one way to improve upon your OEM lighting to see and to be seen - there are many others - but the important thing is to pick an approach that suits your needs and then do it - both for your safety and for your enjoyment!
DDMTuning HID R1200RT Install Guide, Low Beams, 2008, H7 bulb
INSTALL DATE MAY 2016
There are many posts on the this forum (and other forums) discussing the merits and drawbacks of installing HID lighting in your low beams - including bulb color, canbus issues, wiring, reflectors, failures, manufacturers, etc - it is not the purpose of this Install Guide (IG) to rehash these issues as a search of of forum(s) will provide you with ample ideas regarding lighting options/advantages/drawbacks; rather, this IG will provide a bit more on the 'how to' side to hopefully convince someone on the fence regarding a DIY HID install that this is a project they wish to tackle. Also, this IG provides guidance current as of MAY 2016.
BIKE: 2008 BMW R1200RT (although likely applicable to many other models and years which is why I posted to the Technical Files section).
HID: DDMTuning(.com), #DDM35WH7, Qty 1 (they come as separate lights with separate wiring harness and ballast for each light), DDM HID Kit, 35Watt, H7 Bulb, 4500K, $30(total for 2 lights) plus $14 shipping (ship straight from China via USPS - supplied with tracking number so you can note shipping progress - took about 7 days to arrive at my California West Coast destination - guessing it would take longer if you are inland). Some say DDM Tuning products are CHEAP - I prefer the term INEXPENSIVE - why, well they are made in China of course but mainly because they are made in high volume for CARS (who just happen to use H7 bulbs also) plus they come with a lifetime guarantee - so save your old H7 bulbs in case you need them as you can't get a replacement UNTIL you send back the defective bulb and a new unit is sent to you. They don't come with instructions but there are some online - not sure that they help much so I have not provided any links.
BACKGROUND: Most call this installation easy. For me it was easy BUT took me all day. The electrical is 'plug and play' - but the mechanical side takes the time.
TOOLS/SUPPLIES: drill, 1inch diameter hole drill (to drill hole in center of plastic low beam cover cap), flat file (to file lettering flat on cap to provide best grommet seal), half round file (to chamfer plastic burrs around hole), round rat tail file (to file dog ears in both cap and spacer to pass DDM Tuning electrical connector), electrical tape (to wrap connections between OEM bulb male power to the DDM female power - my BMW has lots of miles a prior repair was made by soldering new connections and the wire at the bulb had actually disintegrated and/or the plastic OEM connector at the bub had disintegrated), volt meter (to ensure that YELLOW wire is positive and connected to the DDM RED wire and the BROWN wire is negative and connected to the DDM Tuning BLACK connector), 0.05 inch diameter wire (to wire the ballast to the bike), torx srew drivers (to remove panels), two annular spacers (used on grommet to ensure an even better seal for the bulb dust cover cap - I used my local ACE Hardware to get nylon white plastic rings, 1.5 inch OD, 1.0inch ID, by 0.084 inches thick - other types of spacers would work just fine but they likely need to be in the range of 0.05 to 0.08 inches thick to allow a superior seal - if you desire same), a bungee cord from which to hang left side fairing panel, small tin snips to cut the clear plastic protective bulb cap base off the DDM harness.
INSTALLATION STEPS:
1. Parts Removal - Remove both mirrors by pulling them off, remove both side fairing panels (I hung the left panel from my bike with a cord to avoid removing the electrical plug which is always a battle for me), and remove dash cover. This can be done by using your torx driver in a few minutes and is essential IMHO to an easy(ier) installation as you can then see what you are doing and prevent any bulb damage during installation plus you have lots of room for your hands. Remove both dust covers, remove the H7 wiring connection, remove the spring clip holding the H7 bulbs, remove both H7 bulbs (keep your fingers off them - don't use gloves as best to have feel of your fingers - clean them with alcohol if you touch them with any part of your body and/or grease/dirt - save these H7 bulbs for possible future reuse).
2. Parts Modification - Drill a 1 inch diameter hole in each cap. On the caps and the spacer file out some dog ears 180 degrees to each other, about 0.07 inches across the diameter and about 0.3 inches wide (just enough to pass the DDM plug - enlarge photo to see this detail). File any lettering on dust cover cap smooth so the grommet seals well to dust cover.
3. Ballast Install - Wire (I used nominal 0.05 inch diameter wire) the ballast (via there mounting holes on ballast) to the cross braces on the back of the speaker covers (or find some other suitable location sufficiently close to connect the ballast)
4. Bulb Install - Remove the plastic clear screw cover protecting the HID bulb and snip off the clear plastic case. Install the HID bulb (don't use gloves and don't touch the bulb glass to you or to anything) while looking at the rear then in through the front of the headlight so you can be assured all is properly aligned - you can feel the bulb taps seat - but just barely - so look in the front also. Secure the retainer clip, plug the OEM wires (female) into the DDM wires (male) - then put some electrical tape onto the connectors as may be necessary. Pull the spacer onto grommet and then push it through the modified dust cover (spacer stays on inside). Screw on the dust cover. DON'T put dust cover onto grommet until bub has been installed as it makes it much harder to position bulb if the dust cover is on grommet.
5. Assembly - Put the dash board cover with ballasts loosely (do not screw on just yet) into place and then connect the three DDM water tight plugs together - make sure they each make a clean 'snap' together so they can not come apart. There is sufficient cable slack but connecting them is so much easier if dash cover is loose.
6. Test - Put bike in neutral, start it up, and test that your lights come on OK. Mine did - hope yours do!
Replace Parts - Fasten dash cover, install fairing panels, and push side mirrors back on.
7. OEM H7 Reinstall: If my HID unit(s) should fail I plan on replacing them with the original OEM H7 bulbs I removed - until I can get a replacement. I would do this by removing all the parts as noted in Step 1 as it would be so much easier for me than to risk damaging a bulb or to loose any more knuckle by trying to take a short cut approach - but each to his own.
PHOTOGRAPHS:
The following photo shows the DDM lights with the top part of the photo showing a completely connected unit (bulb with clear protective cover not yet removed, DDM low voltage supply the connects to BMW female connections, dust cover with grommet and spacer connected to cover, and ballast with three watertight DDM plugs. The bottom part of the photo shows the holes in the DUST COVER, the SPACER, and the grommet (the spacer is mounted inside the dust cover on the left such that the rubber grommet provides a good seal onto the outer portion of the DUST COVER.)
The last photo shows the ballast mounted onto the back side of the speaker dash cover.
So far I am pleased with my DDM Tuning HID lights - no canbus issues (yet) and plenty of side light (helps greatly navigating road bends and seeing critters in the dark). These HIDs are great for daylight riding as you are easily seen (compared to OEM lights) AND folks often pull over to allow you to safely pass. As others have done I am planning on replacing my High Beam with an OSRAM Rallye 65W Ultra Output H7. The methods in this procedure are just one way to improve upon your OEM lighting to see and to be seen - there are many others - but the important thing is to pick an approach that suits your needs and then do it - both for your safety and for your enjoyment!