CANADIANSTEVE
Go Leafs Go
Silly perhaps, but should the the centerstand on my 92 RS have a hole in the bottom of one "foot " Never noticed this before now ... Thanks.
Steve
Steve
Follow along with the video below to see how to install our site as a web app on your home screen.
Note: This feature may not be available in some browsers.
Any chance you could take a picture and post it?
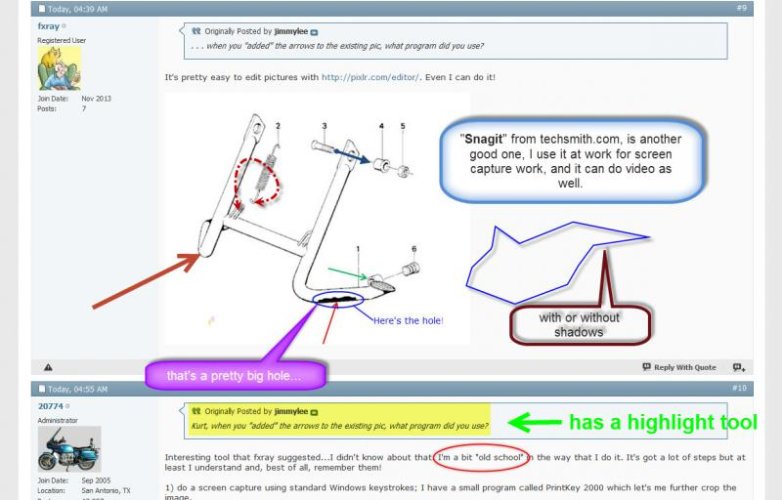
Is the hole where the red arrow points or where the green arrow points? The green arrow seems to point to a hole that is built in...not sure why.
If it's the red arrow, I'd have to say that having a hole in the bottom of the stock centerstand foot is not OEM. I've seen pictures of stands where the repeated on/off the centerstand has worn a flat spot in the foot and eventually a hole. Then the degradation process proceeds quickly and the foot begins to lose structural strength.
. . . when you "added" the arrows to the existing pic, what program did you use?
![cstandhole[1].jpg](https://forums.bmwmoa.org/data/attachments/34/34550-45e912c79f1499c532ce1749e7f02d08.jpg "cstandhole[1].jpg")
Kurt, when you "added" the arrows to the existing pic, what program did you use?
what would cause the stand NOT to stay in the UP (not in use) position?
While we're on the subject of centerstands, what would cause the stand NOT to stay in the UP (not in use) position? I just figured the spring was weak as mine did not seem to want to stay up. I installed a new spring and now it's worse. At least it would "kind of" stay up with the old spring. Now I can't find the old spring to use in place of the new one that is not useable.
Interesting tool that fxray suggested...I didn't know about that. I'm a bit "old school" in the way that I do it. It's got a lot of steps but at least I understand and, best of all, remember them!
1) do a screen capture using standard Windows keystrokes; I have a small program called PrintKey 2000 which let's me further crop the image.
2) drop the image (from the Windows clipboard) into PowerPoint
3) use the tools in PowerPoint to draw arrows, add text, etc.
4) group all of the images in PowerPoint into a single "layer" or image
5) cut-n-paste the single image into Irfanview and save the image to my local drive
6) then the image can be uploaded
It's probably easier to use something like Windows Paint...not as fully functional but you wouldn't have to use PowerPoint or Irfanview.
Yeah, that can be common depending on use. Welding the area up isn't such a big deal for someone who knows what they're doing. Here's something to consider:
http://beemersandbits.com/2011/09/airhead-center-stand-rehab/
good news .. fellow at my work will weld the hole in the stand for me. Thanks everyone.
Steve

 Lew has always been the master at annotation for us! Thanks!